


Chapter 20: Port Trunking
240 Section II: Web Browser Interface
Setting Up a Port Trunk
This section contains the following procedures for working with port trunks:
“Creating a Port Trunk,” next
“Enabling or Disabling a Port Trunk” on page 241
Creating a Port
Trunk
This procedure explains how to create a port trunk.
Note
Do not connect the cables of a port trunk to the ports on the switch
until after you have configured the ports on both the switch and the
end node. Connecting the cables prior to configuring the ports can
create loops in your network topology. Loops can result in broadcast
storms, which can adversely affect the operation of your network.
To create a port trunk, perform the following procedure:
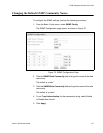
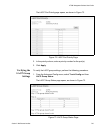
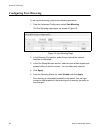
1. From the Advanced Config menu, select Trunk Config.
The Trunk Configuration page opens, as shown in Figure 71.
Figure 71. Trunk Configuration Page
If the switch does not contain a port trunk, all of the ports on the switch
are unchecked. If there is a port trunk, the ports in the trunk are
checked.
2. In any one of the unused Trunk ID rows, click the check box next to the
ports that will make up the port trunk. A check in a box indicates the
port is a member of the trunk. No check means the port is not a
member. A port trunk can contain up to eight ports.