


AT-S84 Management Software User’s Guide
Section I: Using the Menus Interface 63
Enabling Authentication Traps
To enable SNMP authentication traps, perform the following procedure:
1. From the Main Menu, type B to select Basic Switch Configuration.
The Basic Switch Configuration Menu is shown in Figure 4 on page 32.
2. From the Basic Switch Configuration menu, type N to select SNMP
Configuration.
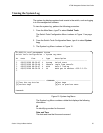
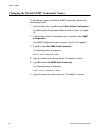
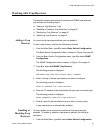
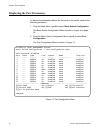
The SNMP Configuration menu is shown in Figure 16.
Figure 16. SNMP Configuration Menu
3. Type E to select Enable/Disable Authentication Trap.
The following prompt is displayed:
Enable or Disable SNMP Authentication Trap (E/D)>
4. Type E to enable SNMP or D to disable SNMP. The default is Enabled.
AT-9000/24 Local Management System
Basic Switch Configuration -> SNMP Configuration Menu
SNMP Read Community: public
SNMP Write Community: private
Trap Authentication: Enabled
SNMP Trap Receivers:
No. Status IP Address Community
--- ----- -------------- ------------------------------------
1 Deleted <empty> <empty>
2 Enabled 149.35.8.42 Monitor
3 Deleted <empty> <empty>
4 Deleted <empty> <empty>
-----------------------------<COMMAND>--------------------------------------
Set SNMP [R]ead Community [A]dd SNMP Trap Receiver
set SNMP [W]rite Community [D]elete SNMP Trap Receiver
[M]odify SNMP Trap Receiver [E]nable/Disable Authentication Trap
Enable/Disable SNMP [T]rap Receiver [Q]uit to previous menu
Command>