


Chapter 6: Port Trunking
90 Section I: Using the Menus Interface
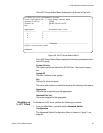
8. Type M to select Manual Trunk for a basic trunk without LACP
handling.
The A and P options apply to LACP trunks. See “Setting Up an LACP
Trunk” on page 92 for more information.
The trunk is now operational on the switch.
9. Configure the port trunk on the other switch and connect the cables.
Modifying a Port
Trunk
This procedure adds and removes ports from a port trunk.
Note
Disconnect the cables from the ports of the trunk on the switch
before modifying it. Adding or removing ports from a trunk without
first disconnecting the cables can create loops in your network
topology, which can cause broadcast storms and poor network
performance.
To add or remove ports from a trunk, perform the following procedure:
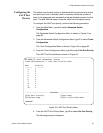
1. From the Main Menu, type A to select Advanced Switch
Configuration.
The Advanced Switch Configuration Menu is shown in Figure 21 on
page 88.
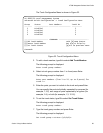
2. From the Advanced Switch Configuration Menu, type T to select
Trunk Configuration.
The Trunk Configuration Menu is shown in Figure 22 on page 89.
3. To add ports to a port trunk, type A to select Add Trunk Member. To
remove ports, type R to select Remove Trunk Member.
The following prompt is displayed:
Enter trunk group number>
4. Type the number of the trunk group you want to modify and press
Enter.
The following prompt is displayed:
Enter port members (up to 8 ports) for trunk
n
>
5. Enter the ports you want to add or remove from the trunk and press
Enter.