


7-27
Network Processing Engine and Network Services Engine Installation and Configuration
OL-4448-12
Chapter 7 NPE-G1 and NPE-G2 Installation and Configuration Information
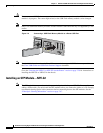
Installing the NPE-G1 or NPE-G2
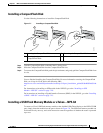
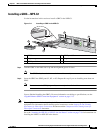
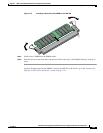
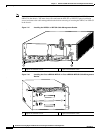
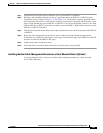
Figure 7-15 Removing or Installing an SDRAM SODIMM
Step 3 Remove the SODIMM from the socket. Avoid touching the SODIMM as much as possible, particularly
the traces, the metal fingers on the connector side of the SODIMM.
Step 4 Place the SODIMM in an antistatic shielding bag.
Installing a SDRAM SODIMM
Caution SODIMMs are sensitive components that are susceptible to ESD damage. Handle SODIMMs by the
edges only; avoid touching the memory modules, pins, or traces (the metal fingers along the connector
edge of the SODIMM).
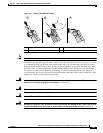
Step 1 Remove a new SODIMM from the antistatic container.
Step 2 Hold the SODIMM component-side-up, with the connector edge (the metal fingers) away from you.
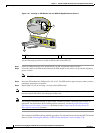
Step 3 Align the new SODIMM notch with the connector and insert the SODIMM into the socket.
Caution When inserting the SODIMM, use firm but not excessive pressure. If you damage a socket, you will have
to return the NPE-G1 to the factory for repair.
Step 4 Gently press on the SODIMM until the SODIMM spring latches snap into place.
1 SODIMM
66437
1