


Operation, cont’d
MPX Plus 866 A Media Presentation Matrix Switcher • Operation
3-38
PRELIMINARY
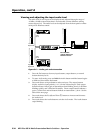
Viewing and adjusting the output volume
The audio level of each output can be displayed and adjusted through a range of
100% (no attenuation) to 0% (maximum [100 dB] attenuation). The audio level can
be adjusted from the front panel or under RS-232 or Ethernet control.
N
Output volume is protected when front panel Lock mode 2 is selected. You can
view the volume in Lock mode 2 but you cannot adjust it from the front panel.
See “Setting the front panel Locks (Executive modes)” on page 3-44.
1
. Press the Esc button to clear any input buttons, output buttons, or control
buttons that may be lit.
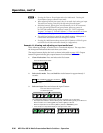
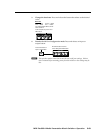
2
. To enter Audio mode, press and hold the Audio button until the button begins
to blink red, then release the button.
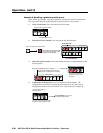
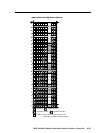
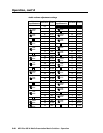
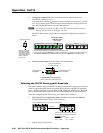
3
. Press and release an output button in the computer video/audio output
group to select an output. The input buttons display the volume level for
the selected output; the more buttons that are lit, the higher the volume. The
fewer buttons that are lit, the lower the volume.
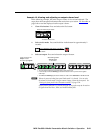
For a more detailed analysis of decoding the displayed value, see “Reading
the displayed volume” on the next page.
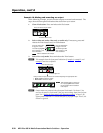
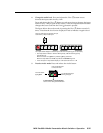
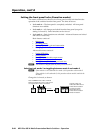
4
. Press and release the Esc (
>
) and View (
>
) buttons to increase and decrease
the audio volume.
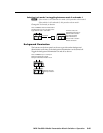
5
. Press and release the Audio button to save the audio settings and exit the
Audio mode. The Audio button stops blinking.
N
• Whenadjustedfromthefrontpanel,thereisoneaudiolevelsettingperinput.
The audio level setting is shared by the left and right audio outputs.
• Individualcontrols,offeringnertrimadjustments(in0.1dBincrements)
for the right and left channels and group master offsets are present in
the DSP and available through software control (see “DSP Configurator
Program”, in chapter 5, “Switcher Software“). These controls are not shown
in the front panel display.
• Theaudiovolumelevelsarestoredinnon-volatilememory.Whenpoweris
removed and restored, the audio level settings are retained.
• ExitingAudio mode by pressing the Audio button always returns the I/O
buttons to Video lit green and Audio lit red (video and audio selected for
configuration).
• PressingtheEnterorPresetbuttonalsoexitsAudio mode. Pressing the
Preset button changes to Recall Preset mode.