


Section 8: Adjustment Procedures
M84Pro Service Manual PN 9001111A Page 8-4
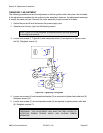
4 Begin continuous printing of self-test labels.
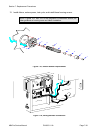
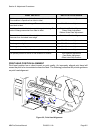
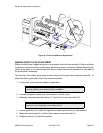
5 Loosen paper guide thumbscrew (1, Figure 8-3) and adjust guide fully outward.
6 Loosen set screw (2) to allow the right side of print head (3) to be adjusted.
7 Manipulate screw (4) to adjust print head (3) while observing scale (5) under latch (6).
8 Retighten set screw (3).
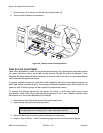
NOTE: Figures 10-2 and 10-3 of the Diagrams & Schematics section
provides guidance on media and ribbon installation.
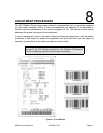
NOTE: The self-test label identifies if any elements are malfunctional. To the
far right of the Head Check row, OK will be printed if elements are not missing
and NG if any are missing. Begin a troubleshooting process should difficulties
be found. It is recommended that the troubleshooting process begin at the
rear of the printer and work forward.
NOTE: The print speed and darkness should be set so as to assist in
determining if the print image is being improved during alignment. The speed
and darkness settings are identified on the self-test label. Adjust as deemed
necessary.
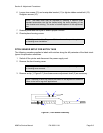
NOTE: The self-test label provides incremented patterns across its upper
and lower perimeters for adjustment assistance. Observe print quality in
these regions during adjustment.
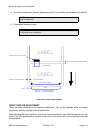
NOTE: By moving the paper guide away from the label’s edge, it allows the
stock to wander. Observe label movement during the printing and adjustment
process for assistance.
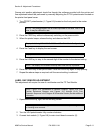
NOTE: The left edge of the ribbon should always cover the label’s left edge
by 1/8 inch.
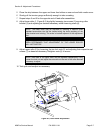
NOTE: Clockwise screw rotation raises the print head on the right side.
Counter-clockwise rotation conversely lowers the print head.