


Section 7: Replacement Procedures
M84Pro Service Manual PN: 9001111A Page 7-5
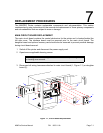
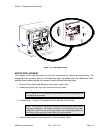
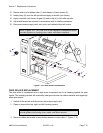
MEMORY CARD REPLACEMENT
The optional memory card is direct connected to the main circuit board behind the daughter
board. To replace the memory card, follow the daughter board replacement procedures for card
access. Then pull the mounting brackets away from the memory card while pivoting the card
outward.
To insert a new memory card, insert the contact side of the card into its mounting bracket first
followed by the remainder of the card. The optional memory card is designed so that it will only
mount if properly oriented.
POWER BOARD REPLACEMENT
1 Switch off the printer and disconnect the power supply cord.
2 Open/remove the top, right, and left housing covers.
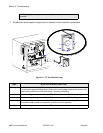
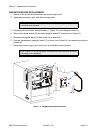
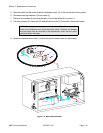
3 Locate power board (1, Figure 7-5) in the lower left corner of the printer.
4 Disconnect circuit board wiring harness (A) from power board (1).
5 Disconnect cutter harness (B) from power board (1) if applicable.
6 Remove two screws (2) securing cable guard (3) to printer base.
7 Lift away cable guard (3) and disconnect power supply harness (C).
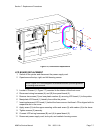
8 Remove two screws (4) from the exterior back side of printer.
9 Remove one screw (5) from the interior securing power board (1) to the printer housing.
10 Manipulate power board (1) from within the printer.
11 Insert replacement power board (1) into printer housing oriented so that the power recepta-
cle protrudes from the rear.
12 Secure power board (1) to the printer using screw (5) and two screws (4).
13 Connect power supply harness (C) and cover with cable guard (3).
14 Secure cable guard (3) to the printer using two screws (2).
15 Connect cutter harness (B) to power board (1) if applicable.
16 Connect circuit board harness (A) to power board (1).
17 Reconnect power supply cord, test cycle, and reattach housing covers.
NOTE: Figure 10-1 of the Daigrams & Schematics section provides guidance
on housing cover removal.
NOTE: Figure 10-1 of the Daigrams & Schematics section provides guidance
on housing cover installation.