


Section 8: Adjustment Procedures
M84Pro Service Manual PN: 9001111A Page 8-11
Coarse print position adjustment should be through the software provided with the printer and
fine adjustment should be performed by manually adjusting the PITCH potentiometer located on
the printer front panel cover.
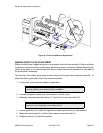
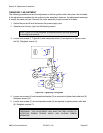
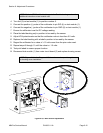
1 Turn OFFSET potentiometer (1, Figure 8-9) located on the front panel to the center
position.
2 Press the FEED key while simultaneously switching on the power switch.
3 When the printer beeps, release the key and observe the LCD.
4 Press the Feed key to display the next screen.
5 Press the LINE key to step to the second digit of the counter to the desired setting.
6 Press the FEED key to test print a label. Press the FEED key again to stop printing.
7 Repeat the above steps as required until the correct setting is achieved.
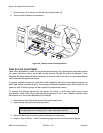
LABEL GAP SENSOR ADJUSTMENT
This adjustment will require the use of a multimeter and the TP Test Module.
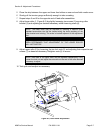
1 Open/remove the top, right, and left housing covers.
2 Turn the VR4 potentiometer fully counter-clockwise.
3 Connect test module (1, Figure 8-9) to main circuit board connector (2).
NOTE: The potentiometer has a scale imprinted on its face. Due to its
size, it may be difficult to see.
Display: “Initializing ROM V00.00.00.00” and “Test Print Mode Configuration”.
Display: “Test Print Size 10CM”.
NOTE: The display will increment one step each time the key is pressed.
NOTE: Figure 10-5, Accessories & Sensors Location; Figure 10-6, Print
Position Reference Diagram; and Figures 10-7 through 10-19, Print
Operation Sequence in the Diagram & Schematics Section provide additional
instruction.
NOTE: Figure 10-1 in the Diagrams & Schematics section provides guidance
on housing cover removal.