


Section 7: Replacement Procedures
M84Pro Service Manual PN: 9001111A Page 7-25
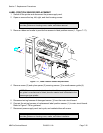
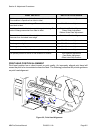
CUTTER BELT REPLACEMENT
The cutter assembly is an accessory to the printer. As a purchase option, the cutter assembly
may not apply to the printer in question. The cutter assembly mounts to the face of the printer in
place of the standard front cover.
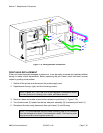
1 Switch off the printer and disconnect the power supply cord.
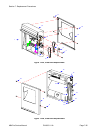
2 Remove cutter assembly (1, Figure 7-23a) from the printer.
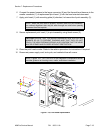
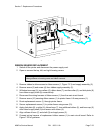
3 Remove two screws (2) securing idle gear bracket (3) and lift away.
4 Withdraw cutter timing belt (4) and motor timing belt (5) from cutter assembly (1).
5 Apply replacement motor belt (5) to motor pulley (6) and idle pulley (7).
6 Apply replacement cutter belt (4) to idle pulley (7) and cutter pulley (8).
7 Apply bracket (3) to the assembly oriented as removed and secure using two screws (2).
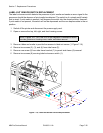
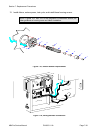
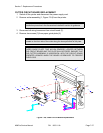
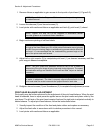
8 Prepare to replace o-ring belt (9, Figure 7-23b).
9 Remove two screws (10) and two screws (11) from left and right sides of cutter frame (12).
10 Lift cutter cover (13) away from cutter frame (12).
11 Loosen screws (14), (15), (16), (17), and (18) located on the right side of cutter frame (12)
sufficiently to manipulate the right end of feed roller (19) free.
12 Remove worn o-ring belt (9) from feed roller (19) and stepper motor (20).
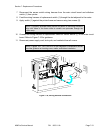
13 Apply replacement o-ring belt (9) to feed roller (19) and stepper motor (20).
14 Insert right end of feed roller (19) into cutter frame (12) and tighten screws (18), (17), (16),
(15), and (14).
15 Apply cutter cover (13) to cutter frame (12) and secure with two screws (11) and (10) to the
right and left sides respectively.
16 Re-install the cutter assembly, connect power supply cord, and test cycle.
NOTE: If unsure how to remove the cutter assembly, refer to the Label Cutter
Installation procedure in the Accessories Installation section for guidance.
NOTE: When properly installed, the idle bracket gear will apply tension pres-
sure to the outer surface of the cutter belt.
NOTE: Refer to the Label Cutter Installation procedure in the Accessories
Installation section of this manual for installation guidance.