


Section 5: Printer Configuration
M84Pro Service Manual PN 9001111A Page 5-23
DEFAULT SETTING
COMPLETED
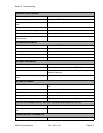
When the printer has completed the reset process it will beep 3 times and the
Default Setting Completed display will appear. At this time the printer is in the
default configuration.To exit the Default Setting Mode, power the printer off
and then back on.
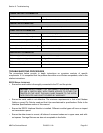
MAINTENANCE/FACTORY MODE
This function is used to clear counters and reset the printer’s firmware. It is also used after upgrading the
flash firmware or installing a new memory module.
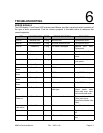
LCD DISPLAY DEFINITION
MAINTENANCE MODE
DIPSW2-4 ON>OFF
Record all dip switch positions and place all in the OFF position.
1. Place DSW2-4 switch in the ON position.
2. Press and hold the LINE and FEED keys while switching on the power.
3. Release the LINE and FEED keys when the printer beeps.
FACTORY MODE 4. Place the DSW2-4 switch in the OFF position.
5. Press the FEED key to advance to the next display.
COUNTER CLEAR
NONE
6. Use the LINE key to step the cursor to the desired option.
7. Press the FEED key to select the option and advance to the next display.
PRINT SIZE
SMALL LARGE
8. Use the LINE key to step to the desired option (128 mm or 266 mm).
9. Press the FEED key to select the option and initiate test printing.
PRESS ENTER KEY
TO STOP PRINTING
The FEED key may be pressed and repressed to start and stop printing
at will.
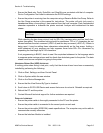
ALL CLEAR MODE
This function is used to clear counters and reset the printer’s firmware. It is also used after upgrading the
flash firmware or installing a new memory module.
LCD DISPLAY DEFINITION
MAINTENANCE MODE
DIPSW2-4 ON>OFF
Record all dip switch positions and place all in the OFF position.
1. Place DSW2-4 switch in the ON position.
2. Press and hold the LINE and FEED keys while switching on the power.
3. Release the LINE and FEED keys when the printer beeps.
FACTORY MODE 4. Place the DSW2-4 switch in the OFF position.
5. Press the FEED key to advance to the next display.
ALL CLEAR MODE 6. Press the FEED key to ENTER THE ALL CLEAR COUNTER EEPROM
Mode.
ALL CLEAR
COUNTER EEPROM
7. Use the LINE key to step to the desired option (COUNTER).
8. Press the FEED key to select the option and display the current value.
XXXXXXXALL CLEAR
YES NO
9. Use the LINE key to step to the desired option (YES) and ENTER to
select the option.
XXXXXXXALL CLEAR
COMPLETED
LCD DISPLAY DEFINITION