


4-10
Cisco MGX 8230 Edge Concentrator Installation and Configuration
Release 1.1.31, Part Number 78-11215-03 Rev. B0, May 2001
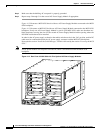
Chapter4 Enclosure Installation
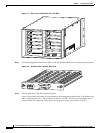
Rack Mounting an MGX 8230
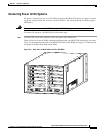
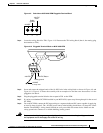
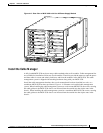
Re-install the front cards
Step 1 Be sure the extractor is in the unlatch position.
Step 2 Position the rear card guides over the appropriate slot at the left (top) and right (bottom) of the card cage.
Step 3 Gently slide the card all the way into the slot and then press/rotate the insertion/extractor lever (or both
levers on double-height cards) until it (or they) snaps into the vertical position.
Caution To prevent damage to components on the bottom side of the card, support the face plate and keep the
card level while sliding it into the chassis.
Note The card should slide in and out with only slight friction on the adjacent board’s EMI gaskets. Do
not force the card. Investigate any binding.
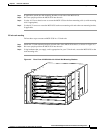
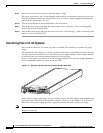
Re-install the back cards
Step 1 Ensure the two extractor levers are rotated to the “in” position. When the card is being inserted into the
slot, the levers should be horizontal along the line of the back card.
Step 2 Position the rear card edges over the appropriate guides at the left and right sides of the MGX 8230 card
cage.
Step 3 Gently slide the card all the way into the slot and push to seat the card.
Step 4 Alternately tighten the two captive screws on the back card’s faceplate.
Tighten the right and left captive screws in increments to prevent misalignment of the card. Do not
overtighten the screws, but secure the card.
Warning
Cards must be inserted in the correct slot positions. This is particularly true with back cards. If
service module back cards are inserted into slots intended only for MGX 8230 PXM back cards,
slots 1 and 2, damage can be done.
If you accidentally attempt to insert a service module back card into slots 1 and 2 and have
difficulty in operating the shelf, examine the backplane pins and the back card connector to see
if they have been bent or damaged.