


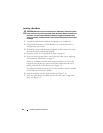

Installing System Components 81
Installing a Non-redundant Power Supply
1
If you are installing a non-redundant power supply to replace redundant
power supplies, you will need to replace the power supply distribution
board with the power supply cage cover.
a
Remove the power supply distribution board. See "Removing the
Power Supply Distribution Board" on page 143.
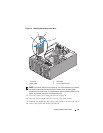
b
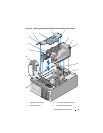
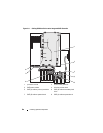
Install the power supply cage cover by pressing the cover into the
power supply cage until the retention pins lock into place. See
Figure 3-41.
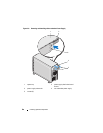
2
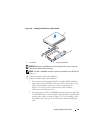
Slide the power supply into the back of the system until the power supply
release tab snaps into place. See Figure 3-8.
3
Install the two Phillips screws to secure the power supply to the system.
See Figure 3-8.
4
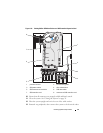
Depending on your system configuration, connect the following power
cables:
• PWR1 connector on the system board
• PWR2 connector on the system board
• PWR3 connector on the system board
• BP_PWR connector on the optional SAS/SATA backplane
• Hard drives
• Diskette drive
• Tape backup unit
• Optical drives
5
Install the processor shroud. See "Installing the Processor Shroud" on
page 74.
6
Install the expansion card shroud. See "Installing the Expansion Card
Shroud" on page 75.
7
Close the system. See "Closing the System" on page 70.
8
Place the system upright and on its feet on a flat, stable surface.
9
Reattach any peripherals, then connect the system to the electrical outlet.
10
Turn on the system and attached peripherals.