


88 Installing System Components
14
Turn on the system and attached peripherals.
See the documentation that came with the drive for instructions on
installing any software required for drive operation.
15
Press <F2> to enter the System Setup program (see "Entering the System
Setup Program" on page 43), and ensure that the drive’s controller is
enabled.
16
Exit the System Setup program and restart the system.
17
Partition and logically format the drive.
See the documentation for your operating system for instructions.
18
(Optional) Test the hard drive by running the system diagnostics. See
"Using Dell PowerEdge Diagnostics" on page 193.
19
If the drive you just installed is the primary drive, install your operating
system on the hard drive.
Removing a Hot-plug Hard Drive
When available, your system may have an optional lever-release drive bay,
providing space for up to four hot-plug SAS or four hot-plug SATA hard drives.
The hard drives plug into the SAS/SATA backplane, and they
are supplied in
special hot-plug drive carriers that fit in the lever release drive bays.
1 Remove the front drive bezel, if attached. See "Removing the Front
Drive Bezel
" on page 66
.
2
From the RAID management software, prepare the drive for removal a
nd
wait until the hard-drive indicators on the drive carrier signal that the
drive can be removed safely.
See your SAS/RAID controller
documentation for information about hot-plug drive removal.
If the drive has been online, the green
activity/
fault indicator will flash as
the drive is powered down. When both drive indicators are off, the drive
is ready for removal.
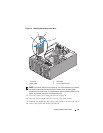
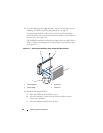
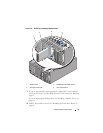
3 Open the drive carrier release handle to release the drive. See
Figure 3-13
.
4
Slide the hard drive out until it is free of the drive bay.
5
If you do not replace the hard drive, insert a drive blank in the vacated
drive bay. See "Installing a Hot-plug Hard Drive Blank" on page 91.