


DFX-8500
Rev. B
3-3
8
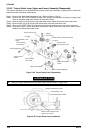
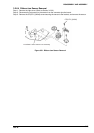
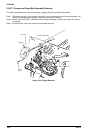
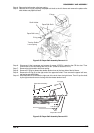
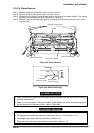
3.2.6.7 Plunger and Paper Bail Assembly Removal
This section describes how to remove the plunger (loading solenoid) and paper bail assembly.
Step 1: Disconnect the black, 2-pin plunger connector from the connector junction board assembly, and
remove the plunger cable from the connector junction board assembly.
Step 2: Remove the two CP(S-P1) (M3x6) screws securing the plunger to the left side frame and remove
the plunger.
Step 3: Remove the iron core of the plunger from the paper bail shaft.
Plunger
Iron C ore
C P (S -P 1 )(M 3 X 6 )
2-pin
Black
Figure 3-54. Plunger Removal