


Table 24: Tools and Parts Required (continued)
ComponentsTool or part
Air filter
Routing Engine
Craft interface
SCB
Cables and connectors
Fan tray
Phillips (+) screwdrivers, numbers 1
and 2
DPCRubber safety cap
Cables and connectors
DC power supply
Wire cutters
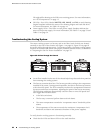
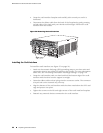
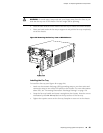
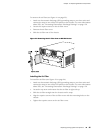
Replacing the Craft Interface
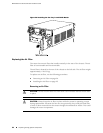
The craft interface is located above the DPC card cage, as shown in
Figure 1 on page 6. It houses the alarm relay interface ports and indicates status
of router components.
The craft interface is hot-insertable and hot-removable. It weighs approximately
1.1 lb (0.50 kg). When you install the craft interface, allow several minutes for the
display to reflect the current state of the router.
To replace the craft interface, use the following procedures:
■ Removing the Craft Interface on page 89
■ Installing the Craft Interface on page 90
■ Replacing Alarm Relay Wires on page 91
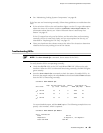
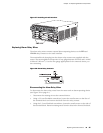
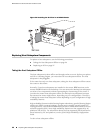
Removing the Craft Interface
To remove the craft interface (see Figure 36 on page 90):
1. Attach an electrostatic discharge (ESD) grounding strap to your bare wrist and
connect the strap to one of the ESD points on the chassis. For more information
about ESD, see “Preventing Electrostatic Discharge Damage” on page 130.
2. Detach any external devices connected to the craft interface.
3. Loosen the captive screws at the top left and right corners of the craft interface
faceplate.
Replacing the Craft Interface ■ 89
Chapter 13: Replacing Hardware Components