


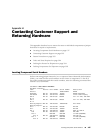


Tools and Parts Required
To remove components from the router or the router from a rack, you need the
following tools and parts:
■ 2.5 mm flat-blade (–) screwdriver, for detaching alarm relay terminal block
■ 3/8–in. nut driver
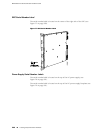
■ Blank panels to cover empty slots
■ Electrostatic bag or antistatic mat, for each component
■ Electrostatic discharge (ESD) grounding wrist strap
■ Flat-blade (–) screwdriver
■ Mechanical lift, if available
■ Phillips (+) screwdrivers, numbers 1 and 2
■ Rubber safety cap for fiber-optic DPCs
■ Wire cutters
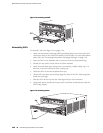
Packing the Router for Shipment
To pack the router for shipment:
1. Retrieve the shipping crate and packing materials in which the router was
originally shipped. If you do not have these materials, contact your Juniper
Networks representative about approved packaging materials.
2. Attach an electrostatic discharge (ESD) grounding strap to your bare wrist and
connect the strap to one of the ESD points on the chassis. For more information
about ESD, see “Preventing Electrostatic Discharge Damage” on page 130.
3. On the console or other management device connected to the master Routing
Engine, enter CLI operational mode and issue the following command to shut
down the router software. (If two Routing Engines are installed, also issue the
command on the backup Routing Engine.)
user@host> request system halt
Wait until a message appears on the console confirming that the operating system
has halted.
For more information about the command, see the JUNOS System Basics and
Services Command Reference.
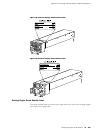
4. Shut down power to the router by pressing the AC switch for all power supplies
to the off (O) position. On both AC and DC power supplies, the switch is located
on the power supply faceplate.
5. Disconnect power from the router. For instructions, see “Replacing an AC Power
Cord” on page 118 or “Replacing a DC Power Supply Cable” on page 119.
204 ■ Tools and Parts Required
MX240 Ethernet Services Router Hardware Guide