


Tools Required
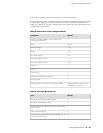
To install the router, you need the following tools:
■ Mechanical lift
■ Phillips (+) screwdriver, number 2
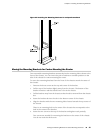
Installing the Router Using a Lift
Before installing the router in the rack, read the safety information in “Chassis-Lifting
Guidelines” on page 132. Remove the router from the shipping container as described
in “Unpacking the Router” on page 37. Install the mounting hardware as described
in “Installing the Mounting Hardware” on page 41.
CAUTION: Before front mounting the router in a rack, have a qualified technician
verify that the rack is strong enough to support the router's weight and is adequately
supported at the installation site.
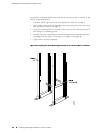
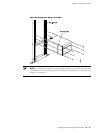
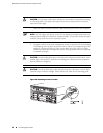
To install the router using a lift (see Figure 25 on page 47):
1. Ensure that the rack is in its permanent location and is secured to the building.
Ensure that the installation site allows adequate clearance for both airflow and
maintenance. For details, see “Preparing the Site for Router
Installation” on page 29.
2. Load the router onto the lift, making sure it rests securely on the lift platform.
3. Using the lift, position the router in front of the rack or cabinet, centering it in
front of the mounting shelf.
4. Lift the chassis approximately 0.75 in. above the surface of the mounting shelf
and position it as close as possible to the shelf.
5. Carefully slide the router onto the mounting shelf so that the bottom of the chassis
and the mounting shelf overlap by approximately two inches.
6. Slide the router onto the mounting shelf until the mounting brackets contact the
rack rails. The shelf ensures that the holes in the mounting brackets of the chassis
align with the holes in the rack rails.
7. Move the lift away from the rack.
8. Install a mounting screw into each of the open mounting holes aligned with the
rack, starting from the bottom.
9. Visually inspect the alignment of the router. If the router is installed properly in
the rack, all the mounting screws on one side of the rack should be aligned with
the mounting screws on the opposite side and the router should be level.
46 ■ Installing the Router Using a Mechanical Lift
MX240 Ethernet Services Router Hardware Guide