


NOTE: Each power supply must be connected to a dedicated AC power feed and a
dedicated external circuit breaker. We recommend that you use a 15 A (250 VAC)
minimum, or as permitted by local code.
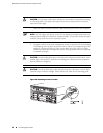
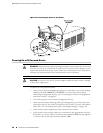
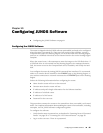
4. Dress the power cord appropriately. Verify that the power cord does not block
the air exhaust and access to router components, or drape where people could
trip on it.
5. Repeat Step 1 through Step 4 for the remaining power supplies.
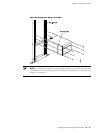
Figure 30: Connecting AC Power to the Router
Powering On an AC-Powered Router
To power on an AC-powered router:
1. Attach an electrostatic discharge (ESD) grounding strap to your bare wrist and
connect the strap to one of the ESD points on the chassis. For more information
about ESD, see “Preventing Electrostatic Discharge Damage” on page 130.
2. Verify that the power supplies are fully inserted in the chassis.
3. Verify that the AC power cord is securely inserted into the appliance inlet.
4. Verify that an external management device is connected to one of the Routing
Engine ports (AUX, CONSOLE, or ETHERNET). For more information about
connecting management devices, see “Connecting the Router to Management
and Alarm Devices” on page 49.
5. Turn on the power to the external management device.
6.
Switch the AC switch on each power supply to the on position (|) and observe
the status LEDs on each power supply faceplate. If an AC power supply is correctly
installed and functioning normally, the AC OK and DC OK LEDs light steadily, and
the PS FAIL LED is not lit.
Powering On an AC-Powered Router ■ 55
Chapter 9: Grounding and Providing Power to the Router