


If any of the status LEDs indicates that the power supply is not functioning
normally, repeat the installation and cabling procedures described in “Replacing
Power System Components” on page 112.
NOTE: After powering off a power supply, wait at least 60 seconds before turning it
back on. After powering on a power supply, wait at least 60 seconds before turning
it off.
If the system is completely powered off when you power on the power supply, the
Routing Engine boots as the power supply completes its startup sequence. If the
Routing Engine finishes booting and you need to power off the system again, first
issue the CLI request system halt command.
After a power supply is powered on, it can take up to 60 seconds for status
indicators—such as the status LEDs on the power supply and the show chassis
command display—to indicate that the power supply is functioning normally. Ignore
error indicators that appear during the first 60 seconds.
7. On the external management device connected to the Routing Engine, monitor
the startup process to verify that the system has booted properly.
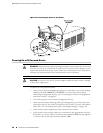
Connecting Power to a DC-Powered Router
CAUTION: Do not mix AC and DC power supplies within the same router. Damage
to the router might occur.
WARNING: Before performing the following procedure, ensure that power is removed
from the DC circuit. To ensure that all power is off, locate the circuit breaker on the
panel board that services the DC circuit, switch the circuit breaker to the off position,
and tape the switch handle of the circuit breaker in the off position.
You connect DC power to the router by attaching power cables from the external
DC power sources to the terminal studs on the power supply faceplates. You must
provide the power cables (the cable lugs are supplied with the router). For power
cable specifications, see “DC Power Cable Specifications” on page 170.
To connect the DC source power cables to the router for each power supply:
1. Switch off the dedicated facility circuit breakers. Ensure that the voltage across
the DC power source cable leads is 0 V and that there is no chance that the cable
leads might become active during installation.
2.
Switch the circuit breaker on the power supply faceplate to the OFF position.
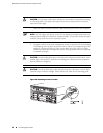
3. Remove the clear plastic cover protecting the terminal studs on the faceplate.
4. Verify that the DC power cables are correctly labeled before making connections
to the power supply. In a typical power distribution scheme where the return is
56 ■ Connecting Power to a DC-Powered Router
MX240 Ethernet Services Router Hardware Guide