


2. Using the Command Line Interface
2-8
August 2002 4200-A2-GB20-00
5. Enable security for your GranDSLAM 4200 unit. Using the TL1 command
ENT-USER-SECU, change the default login and password. Use the EMS to
configure SNMP community strings, the SYSLOG server, and trap managers.
6. Change the time, if necessary. The Simple Network Time Protocol (SNTP),
which maintains the unit’s clock, defaults to enabled for multicast. However,
you can change the time offset from Coordinated Universal Time (UTC) using
the TZOFFSET parameter of the SET-NE-ALL TL1 command. See
SET-NE-ALL
in Chapter 14,
System Commands
for more information.
Configuring the Unit for Operation
Once the unit is connected to the network, the following turn-up procedures should
be performed:
Change the login and password using the ED-USER-SECU TL1 command
from the defaults SUPERUSER, ASN#1500.
Change the SNMP community strings using the EMS.
Optionally, you may also choose to do the following using the EMS:
Configure the syslog server at the NOC.
Configure the trap managers.
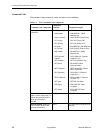
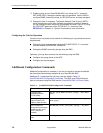
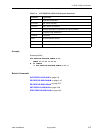
Additional Configuration Commands
Additional configuration is necessary if you do not choose to accept the defaults
that have been automatically assigned to your GranDSLAM 4200.
Additional TL1 commands that you may need are listed in Table 2-2,
GranDSLAM 4200 Configuration Commands. The ADSL and ATM profiles can
also be configured using the EMS (see the
GrandVIEW EMS 3.0 User’s Guide
).
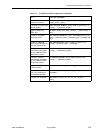
Table 2-2. GranDSLAM 4200 Configuration Commands
To . . . Enter this command . . .
Configure data
associated with the
T1/DS1 facility
ENT-T1:[tid]:NTT1-circuit:[ctag]:::ds1_nblk:
[pst];
Manually configure an
Internet Protocol (IP)
address (Manual mode)
ENT-IPPORT:[tid]:ATM-1:[ctag]::MANUAL:ipport_
nblk:[pst];
Set miscellaneous
configuration parameters,
in particular the use of
SNTP
,
(defaults to
enabled)
SET-NE-ALL:[tid]:[aid_com]:[ctag]:::ne_nblk;
Retrieve a list of equipped
units
RTRV-EQPT:[tid]:ALL;