


RuggedRouter® User Guide
6) Restart the DHCP server or apply changes.
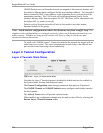
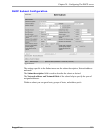
Single Network With Static IP Assignment
In this example the eth1 interface is provided with IP address 192.168.1.1/24.
Assign address 192.168.1.101 to a DHCP client with MAC 00:11:22:33:44:01.
Assign address 192.168.1.102 to a DHCP client with MAC 00:11:22:33:44:02.
Assign address 192.168.1.103 to a DHCP client with MAC 00:11:22:33:44:03.
The router serves as the default gateway.
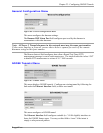
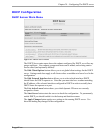
1) Enable eth1 in the 'Edit Network Interfaces' menu.
2) Click 'add a subnet', and configure it for network address 192.168.1.0 with
netmask 255.255.255.0.
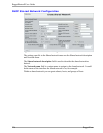
3) Click 'Create' then edit the subnet just created and click 'Edit Client Options'.
4) Set default routers to 192.168.1.1 and save it.
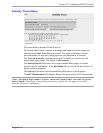
5) Click 'add a new host'.
6) Set the hardware address to Ethernet 00:11:22:33:44:01 and the fixed IP to.
192.168.1.101. Assign the client a hostname as well.
7) Click 'Create'.
8) Repeat steps 5) through 7) for the other hosts with the appropriate address,
MAC and hostname for each client.
9) Restart the DHCP server or apply changes.
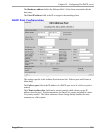
Single Network With Option82 Clients On One Switch
In this example the eth1 interface is provided with IP address 192.168.1.1/24
A a switch connected to eth1 and uses address 192.168.1.2/24.
The switch port 1 is connected to the router while its ports 2 through 8 provide DHCP
relay support. The switch has its DHCP relay server address set to router's address
192.168.1.1. The switch has all ports in VLAN 1. The switch base MAC address is
00:0A:DC:11:22:00.
Assign a client at switch port 2 address 192.168.1.102.
Assign a client at switch port 3 address 192.168.1.103.
Assign multiple clients at switch port 4 dynamic addresses 192.168.1.151 through
192.168.1.200.
The router serves as the default gateway.
1) Enable eth1 in the 'Edit Network Interfaces' menu.
2) Add a new subnet, and configure it for network address 192.168.1.0 with
netmask 255.255.255.0.
3) Enable the 'Disable NAK of option82 clients for this subnet?' option to prevent
confusing some DHCP clients due to the client being on the same network as
the DHCP server and the DHCP relay agent (the switch).
4) Save it then edit the subnet just created and click 'Edit Client Options'.
222 RuggedCom