Appendix E - RADIUS Server Configuration
Appendix E - RADIUS Server Configuration
This section describes how to configure popular RADIUS servers to supply a Vendor-
Specific field, “privilege-level”, which is used by Webmin to assign assign specific
capabilities to Webmin users on a per user basis. Currently, the only privilege-level is
that of “root”, but RuggedCom will be introducing additional levels in upcoming
releases.
FreeRadius
The following steps to add Vendor-Specific attributes to the freeradius RADIUS
server.
1. Locate your dictionary file (usually in /usr/share/freeradius/).
2. In your dictionary directory, open the file “dictionary” add the line
“$INCLUDE dictionary.ruggedcom” to the end of it
3. Create a file “dictionary.ruggedcom” under the dictionary directory containing:
# -*- text -*-
#
# The RuggedCom Vendor-Specific dictionary.
#
# Version: $Id: dictionary.RuggedCom,v 1.3.4.1 2005/11/30 22:17:24 aland Exp $
#
# For a complete list of Private Enterprise Codes, see:
#
# http://www.isi.edu/in-notes/iana/assignments/enterprise-numbers
#
VENDOR RuggedCom 15004
BEGIN-VENDOR RuggedCom
ATTRIBUTE RuggedCom-Privilege-level 2 string
END-VENDOR RuggedCom
4. Users are assigned by adding lines to the file /etc/freeradius/user. Note that
currently, the only privilege-level is that of “root”. For example to assign a
user “john” with a password of “test”, add the following line:
john Auth-Type := Local, User-Password == "test"
4. RuggedCom-Privilege-level = "root"
5. Restart your freeradius server.
Windows Internet Authentication Service
The following steps to configure your IAS server.
1. Create groups used for different privilege level, for example, if the privilege
level is root, you can create a group called RADIUS_RuggedRouter_root. Add
the users having this privilege level to this group.
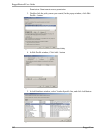
2. Use the New Remote Access Policy Wizard to create a custom policy with the
following settings:
Conditions:
NAS-Identifier matches with Webmin
Windows-Group matches with the group the user belongs to
RuggedCom 301


