


301
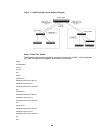
Step 2: Set Up VLAN Routing for the VLANs and the Switch.
The following code sequence shows how to enable routing for the VLANs:
config
vlan database
vlan routing 10
vlan routing 20
exit
# show ip vlan
This returns the logical interface IDs that will be used instead of slot/port in subsequent
routing commands. Assume that VLAN 10 is assigned ID 3/1 and VLAN 20 is assigned ID
3/2.
Enable routing for the switch:
config
ip routing
exit
The next sequence shows an example of configuring the IP addresses and subnet masks for
the virtual router ports.
config
interface 3/1
ip address 192.150.3.1 255.255.255.0
exit
interface 3/2
ip address 192.150.4.1 255.255.255.0
exit
exit
Using the Web Interface to Configure VLAN Routing
Use the following screens to perform the same configuration using the Web Interface:
• Switching --> VLAN--> Configuration. To create the VLANs and specify port participation.
• Switching --> VLAN --> Port Configuration. To specify the handling of untagged frames on
receipt, and whether frames will be transmitted tagged or untagged.
• Routing --> VLAN Routing --> Configuration. To enable VLAN routing and configure the
ports.
• Routing --> IP --> Interface Configuration. To enable routing for the ports and configure
their IP addresses and subnet masks. To enable routing for the switch.