


ENWW Configuring photo (memory card) options 121
Customizing the scan feature in the HP photo and imaging
software (direct connection)
To use the scan feature in the HP photo and imaging software, you must first customize the
options for scanning. Open the HP photo and imaging software and use the onscreen Help for
more information about selecting the word-processing program that you want to use for OCR
and other scan options.
Configuring photo (memory card) options
This section contains information about the following topic.
z Allowing and restricting the photo (memory card) feature
Allowing and restricting the photo (memory card) feature
You can configure the all-in-one so that users are unable to use the PHOTO mode.
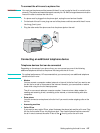
After the all-in-one software has been installed and the all-in-one has been connected directly
to a computer, the memory card reader appears as a drive. On Windows computers, if you
restrict the photo feature from the control panel or embedded Web server, the memory card
reader continues to show as a drive. To remove the memory card reader as a drive, you must
additionally restrict it by using the Device Manager.
Note For Windows computers, the Typical installation is required in order for the photo feature to
function. See Software components for Windows computers for more information.
To allow or restrict the feature
z Embedded Web server (network connection)
Open the embedded Web server, click the Settings tab, and then click Memory Cards.
Turn off the all-in-one off, and then turn it on again.
z Control panel
Press M
ENU, open the ADMIN menu, and use the Photo mode option. Turn off the
all-in-one off, and then turn it on again.
To remove the memory card reader from the list of drives (Windows
computers direct connection)
1 On the computer, open the Device Manager. (The method and location varies according
to the operating system.)
2 Open the folder for disk drives.
3 Right-click the drive for the memory card reader (labeled All-in-one storage device, or
Printer card reader, or something similar).
4 Click Disable or Enable.
5 Click Yes to confirm the action.