


132 9 - Managing the administrator functions ENWW
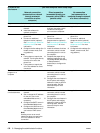
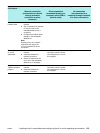
In order to use
this feature . . .
. . . you must complete these setup steps.
Network connection
(connected to a network
through a network
connection or other
computer)
Direct connection
(connected directly to a
computer with a USB or
parallel cable)
No connection
(not connected to a
computer through a network
or a direct connection)
Copy No further steps are needed. No further steps are needed. No further steps are needed.
Print 1 Connect the all-in-one to the
network.
2 Install the software for
network connection.
1 Install the all-in-one software
for direct connection, which
includes connecting the
all-in-one to the computer.
Not applicable.
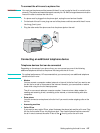
Fax 1 Connect the all-in-one to a
phone line.
2 Connect an additional
telephone device (optional).
See Connecting an additional
telephone device for more
information.
3 Configure the fax settings (fax
header, answer mode, and
ring patterns).
Note:
z Faxing does not require the
network. The fax goes directly
from the all-in-one to the
phone line.
z Faxing does not require the
all-in-one software for direct
connection.
1 Connect the all-in-one to a
phone line.
2 Connect an additional
telephone device (optional).
See Connecting an additional
telephone device for more
information.
3 Install the software for direct
connection, which includes
connecting the all-in-one to
the computer.
4 Complete the steps during
software installation for the
Fax Setup Wizard (Windows)
or Setup Assistant
(Macintosh) to configure fax
settings.
1 Connect the all-in-one to a
phone line.
2 Connect an additional
telephone device (optional).
See Connecting an additional
telephone device for more
information.
3 Configure the fax settings (fax
header, answer mode, and
ring patterns).
Send a scan to a
program on a
computer
Not applicable. 1 Install the software for direct
connection, which includes
connecting the all-in-one to
the computer.
2 Configure the scan feature in
the HP photo and imaging
software in order to perform
scanning tasks. See the
onscreen Help for more
information.
Not applicable.
Send a scan as an
e-mail attachment
1 Connect the all-in-one to the
network.
2 Set or change the IP address
for the all-in-one in the
embedded Web server, if
necessary.
3 Configure the SMTP server in
the embedded Web server.
4 Configure the LDAP server in
the embedded Web server, if
you have an LDAP server.
Note:
Sending a scan as an e-mail
attachment does not require the
all-in-one software for direct
connection.
1 Install the software for direct
connection, which includes
connecting the all-in-one to
the computer.
2 Configure the scan feature in
the HP photo and imaging
software in order to perform
scanning tasks. See the
onscreen Help for more
information
Not applicable.