


97
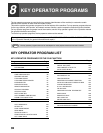
KEY OPERATOR PROGRAMS
8
5
Enter your fax number with the numeric
keys and then press the [OK] key.
• If you make a mistake, press the [C] key and re-enter
the number.
• To enter "+", press the key.
6
Enter your name and then press the
[START] key ( ).
See "ENTERING CHARACTERS" (page 82) for the
procedure for entering letters.
SPEAKER VOLUME
This setting is used to adjust the on-hook volume, the
ringing volume, the line monitor volume, the TX/RX
end sound volume, the original scanning end sound
volume, and the tone output volume. All volume
settings are initially set to "MIDDLE".
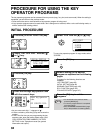
1
Follow steps 1 through 6 of "INITIAL
PROCEDURE" (page 94).
2
Select "INITIAL SETTING" with the [ ] or
[ ] key and then press the [OK] key.
3
Select "SPEAKER VOLUME" with the [ ]
or [ ] key and then press the [OK] key.
4
Select name of the volume that you wish
to adjust with the [ ] or [ ] key and then
press the [OK] key.
5
Select the desired volume level with the
[ ] or [ ] key and then press the [OK] key.
• "HIGH", "MIDDLE" or "LOW" can be selected for the
on hook volume.
• "HIGH", "MIDDLE", "LOW" or "OFF" can be selected
for volumes other than the on hook volume.
TX/RX END SOUND
This program is used to select the beep pattern that
signals the end of transmission or reception. "PATTERN
1", "PATTERN 2" or "PATTERN 3" can be selected.
1
Follow steps 1 through 6 of "INITIAL
PROCEDURE" (page 94).
2
Select "INITIAL SETTING" with the [ ] or
[ ] key and then press the [OK] key.
3
Select "TX/RX END SOUND" with the [ ]
or [ ] key and then press the [OK] key.
4
Select "SEND" or "RECEIVE" with the [ ]
or [ ] key and then press the [OK] key.
5
Select "PATTERN 1", "PATTERN 2", or
"PATTERN 3" with the [ ] or [ ] key and
then press the [OK] key.
Before pressing the [OK] key to store your selection,
you can press the key to listen to the selected
pattern.
TX/RX END SOUND LENGTH
This setting is used to select the length of the end sound
in seconds. Selections are "2.0 sec", "2.5 sec", "3.0 sec",
"3.5 sec", and "4.0 sec". "3.0 sec" is normally selected.
1
Follow steps 1 through 6 of "INITIAL
PROCEDURE" (page 94).
2
Select "INITIAL SETTING" with the [ ] or
[ ] key and then press the [OK] key.
3
Select "TX/RX END SOUND LENGTH" with
the [ ] or [ ] key and then press the [OK]
key.
4
Select the number of seconds with the [ ]
or [ ] key and then press the [OK] key.
EXTENSION TEL
Enable this setting when an extension telephone is
connected to the machine. An extension telephone
connected to the machine cannot be used until this
setting is enabled. The initial setting is enabled.
1
Follow steps 1 through 6 of "INITIAL
PROCEDURE" (page 94).
2
Select "INITIAL SETTING" with the [ ] or
[ ] key and then press the [OK] key.
3
Select "EXTENSION TEL" with the [ ] or
[ ] key and then press the [OK] key.
• The setting is enabled and a checkmark
appears in the checkbox.
• If this procedure is performed when the setting
is enabled, the checkmark will be cleared and
the setting disabled.
To clear the programmed fax number and
name, follow these steps:
(1) Select "DELETE" in step 4 and then
press the [OK] key.
(2) Select "DELETE" with the [ ] or [ ]
key and then press the [OK] key.
Note