


312 CHAPTER 6: NBX MESSAGING
“If you know the extension of the party you want to reach, you may enter
it at any time. To reach the name directory, press 9. To reach the Auto
Attendant, press 0 or remain on the line. Thank you for calling.”
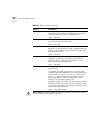
By default, the Auto Attendant main menu provides callers with the
functions that are described in Table 66
.
To create a main menu, select NBX Messaging > Auto Attendant > Menu
Tree. To create or import voice prompts, select NBX Messaging > Auto
Attendant > Menu Tree > Prompt. See the Help for these procedures.
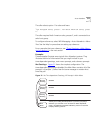
Submenus An Auto Attendant main menu can branch to submenus to
keep the main menu brief, and to give the caller a variety of choices. Each
submenu should have a prompt that informs the caller of the option that
each key pad button provides.
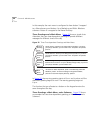
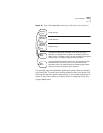
If you have a large organization, the caller may have to enter several
digits and listen to several submenus before reaching the person or
department. For example, the caller may hear:
”
To reach our Sales Department, press 1. For Technical
Support, press 2...
”
Table 66 Auto Attendant Default Configuration
Button Action
1–4 Identifies internal extension range and allows callers to dial user
extensions.
NBX 100: 100–449 (See note 1)
SuperStack 3 NBX: 1000–3999 (See note 2)
9 Goes to the Name Directory.
0 Performs a single-digit transfer to the extension specified in the menu
tree for the auto attendant, usually the extension of the receptionist’s
telephone. The default extension is the lowest extension specified in the
factory default dial plan:
SuperStack 3 NBX: 1000
NBX 100: 100
* Transfers to voice mail box.
# Exits from the system.
T/O Defines what happens when a call times out, typically, a transfer to the
extension specified in the menu tree for the auto attendant, usually the
extension of the receptionist’s telephone. You should always define a
time-out action. If a call times and there is no time-out action defined,
the system disconnects the call.