


46 CHAPTER 2: DIAL PLAN
To import a default dial plan configuration file:
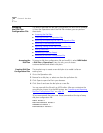
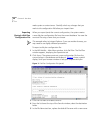
1 In the NBX NetSet – Main Menu window, click Dial Plan. The Dial Plan
window appears, displaying the Operations tab.
2 Click the
Default File radio button. From the Default File pull-down list,
select the default file that you want to use.
3 Click
Import.
4 Reboot the system.
CAUTION: When you import a dial plan configuration file, the
NBX system immediately implements the dial plan. You are always
warned that the system may become inoperative. The system becomes
inoperative only if you have manually modified a dial plan and have
made syntax or content errors. Carefully check any changes that you
make to the configuration file before you import.
Import an International Dial Plan
To change the default North American dial plan to a country-specific dial
plan:
1 In the NBX NetSet – Main Menu window, click Dial Plan. The Dial Plan
window appears, displaying the Operations tab.
2 Click the
Default File radio button.
3 In the list next to the Default File button, select the default file that you
want to use.
4 Click
Import.
CAUTION: When you import a dial plan configuration file, a message
warns you that the dial plan may become inoperative. The system
becomes inoperative only if you have manually modified a dial plan and
have made syntax or content errors. Carefully check any changes that you
make to the configuration file before you import.
5 Click Yes. The system imports the new dial plan and produces a report of
any errors.
6 Reboot the system.
You may see a warning that “destination extension list is empty.” This
means that a particular type of device is not installed. You may safely
ignore this type of warning.