


384 APPENDIX C: CONFIGURING OPTION 184 ON A WINDOWS 2000 DHCP SERVER
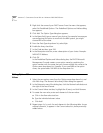
2 Right click the name of your DHCP server. From the menu that appears,
select Set Predefined Options. The Predefined Options and Values dialog
box appears.
3 Click Add. The Option Type dialog box appears.
4 In the Name field, type a name of your choice. For example, because you
are configuring this option to work with the NBX system, you might
choose NBX as the name.
5 From the Data Type drop-down list, select Byte.
6 Enable the Array check box.
7 In the Code text box, type 184.
8 In the Description text box, enter a description of your choice. Example:
NBX NCP IP Address.
9 Click OK.
In the Predefined Options and Values dialog box, the DHCP Microsoft
Management Console creates a new option name by combining the
option number with the name that you chose and adds this name to the
Option name drop-down list. Example: If you used NBX as the option
name, the system adds 184 NBX to the drop-down list.
Editing Option 184
Values
1 Select the new option name from the Option name drop-down list, and
click Edit Array. The Numeric Value Array Editor dialog box appears.
2 In the Data entry area of the dialog box, click the Decimal radio button at
the right of the word Format.
3 In the Current Values text box, highlight the 0 (zero), and click Remove.
4 To create the new value, enter each element of the new value:
a Click in the New value text box.
b Type the individual element value.
c Click Add.
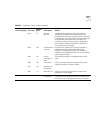
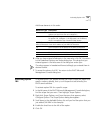
5 Repeat steps 4 a, b, and c for each element in the following table. As you
add each element, it appears in the Current values list, above previously
added values.