


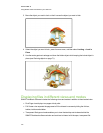

Tips for presenting files to students
The following are tips to keep in mind when presenting files to students:
l Save your completed file on a CD, DVD or USB drive. This enables you to access and display
your presentation by inserting the CD, DVD or USB drive into the computer connected to the
interactive whiteboard or display. Alternatively, make your presentation accessible on your
local area network, and then browse to it on the interactive whiteboard or display.
l To avoid losing your momentum and focus during the presentation, attach the files and links to
web pages that you’ll use during your presentation to the Attachments tab of your file so you
don’t have to search for them (see Attaching files and web pages on page 87).
l If your file contains a lot of pages, separate them into groups. This enables you to find a
particular page more easily during a presentation (see Grouping pages on page 24).
l Display the file in Full Screen view during the presentation. This view maximizes the available
workspace (see Displaying files in Full Screen view on page 104).
l Create objects that slowly fade, open a magnification window or open a spotlight window using
the Magic Pen (see Using the Magic Pen to create fading objects on page 107, Using the Magic
Pen to open amagnification window on page 108 and Using the Magic Pen to open a spotlight
window on page 109).
Hiding objects before presenting them
When presenting files to students, you can hide an object and then reveal it using several techniques:
l Add a Screen Shade to a page. During the presentation, gradually remove the shade to reveal
the underlying text and graphics when you’re ready to discuss them (see Using the Screen
Shade on page 107).
l Cover the object with digital ink and then erase the digital ink (see Writing or drawing digital ink
on page 36).
l Cover the object with another object and then change the order of the objects in the stack (see
Rearranging stacked objects on page 68).
l Use the object animation feature (see Animating objects on page 79).
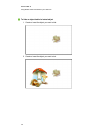
l If you’re using a SMART interactive product with DViT™ (DigitalVisionTouch) technology,
hide an object behind a locked object and then use the enlarge gesture to enlarge and show the
hidden object completing the following procedure.
C HA PT ER 8
UsingSMARTNotebooksoftware inyour classroom
100