


34 International Roaming (GSM)
Creating a GSM Network Profile
Creating a GSM profile should rarely, if ever, be necessary. Whenever you connect a GSM
device, Sprint SmartView creates a GSM network profile for you automatically. The automatically
generated profile can be used to connect to any of Sprint’s roaming partner networks.
There are two types of manually created GSM profiles:
●
Sprint Profiles are actually slightly customized profiles based on Sprint’s default GSM
profile. As such, they inherit Sprint’s GSM connection settings, but allows you to
customize TCP/IP settings (see page 74) and General profile settings (see page 80). At
this time, Sprint is not aware of any specific
situation in which this would be required.
However, the capacity to create such a profile is provided in the event that Sprint’s
Technical Support staff needs to resolve a particular connection problem by helping you
manually alter your connection settings.
●
Custom Profiles are entirely new profiles, unrelated to the Sprint GSM profile. Creating a
custom profile will be required if a non-Sprint SIM is placed in the device.
Important: Sprint does not support the use of non-Sprint SIMs. If you choose to do so, it is entirely your
responsibility to obtain the correct connection information from the provider of the SIM and
enter it correctly into the Network Profile Wizard.
Follow these steps to create a GSM network profile:
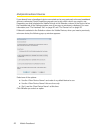
1. Select Profiles from the Tools menu. The Network Profiles window will be displayed.
2. Select Add New Profile from the Settings menu. A list of network profile types appears.
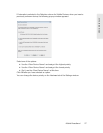
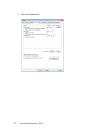
3. Select Mobile and click Add. The first page of the Add Profile Wizard appears. This page
prompts you to choose one of the two profile types.
4. Select either Sprint or Create Custom Profile and then click Next. The Mobile page of the
New Profile Wizard appears (see page 72).
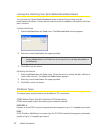
Ⅲ If y
ou selected Sprint on the previous page, the correct settings for the Mobile page
will be pre-populated and you can’t change them here.
Ⅲ If y
ou selected Create Custom Profile, enter the correct settings for connecting to the
desired GSM network.
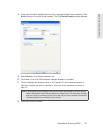
5. Click Next. The IP Settings page appears (see page 74).
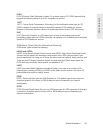
Ⅲ The
default selections in the IP Settings page are correct for most GSM networks. If,
however, a particular network requires a specific IP address, DNS server settings, or
both, you can specify them here.
6. Click Next. The General page appears (see page 80).
Ⅲ The
settings in the General page are largely determined by your preferences. For
example, do you want to launch your browser upon a successful connection? You
can make such choices here.
7. Click Finish.