


7
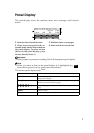
16.
{
{{
{Class}
}}
} key
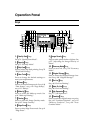
Press to select All Class, Auto Class,
Manual Class, or Class mode. See p.52
“All Class Mode”, see p.54 “Auto Class
Mode”, see p.57 “Manual Class Mode
with One Original”, see p.59 “Manual
Class Mode with two or More Originals”,
see p.61 “Class Mode”.
17. {
{{
{W
WW
W}
}}
} {
{{
{V
VV
V}
}}
} keys (Speed keys)
Press to adjust the printing speed. See
p.25 “Adjusting the Image Density of
Prints”, see p.27 “Changing the Printing
Speed”.
18.
{
{{
{~
~~
~}
}}
}{
{{
{}
}}
}}
}}
}{
{{
{|
||
|}
}}
}{
{{
{{
{{
{}
}}
} keys
Press to shift the image forward, back-
ward, right, or left. See p.24 “Adjusting
the Position of Printed Images”.
Also use to highlight items you wish to
select on the panel display.
19. {
{{
{Program}
}}
} key
Press to enter or recall programs. See p.72
“Programs”.
20. Number keys
Press to enter the desired number of
prints and data for selected modes.
21. {
{{
{Clear/Stop}
}}
} key
Press to stop printing.
22. {
{{
{q
qq
q}
}}
} key
Use to enter data in selected modes.
23. {
{{
{Clear Modes/Energy Saver}
}}
} key
Press to clear any previously entered job
settings.
24. {
{{
{Start}
}}
} key
Press to make a master.
25. {
{{
{Auto Cycle}
}}
} key
Use to process the master and make
prints in one operation. See p.51 “Auto
Cycle”.
26. {
{{
{Proof}
}}
} key
Press to make proof prints.
27. {
{{
{Print}
}}
} key
Press to start printing.