Disassembly, Reassembly and Lubrication
CL-S6621 3-44
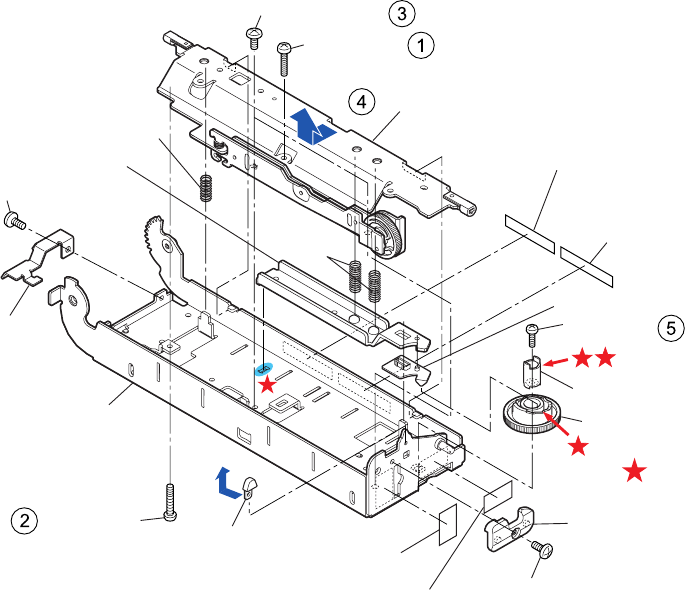
2. Remove the 2 screws (PH, M3x10) ( and ) and 2 screws (BH, M3x4 (NI)) (). Then,
remove the “Plate Holder Head” Block () in the direction of arrow.
3. Remove the “Spring Head L”, “Spring Head R” (2 pcs.), “Plate Head Balance” and “Spacer
Head Balance”.
4. Remove the 1 screw (PH, M3x6) () and detach the “Pivot Head Balance Cam” and “Cam
Head Balance”.
5. Remove the 1 screw (BH, M3x4 (NI)) and detach the “Holder Guide Sensor U”.
6. Remove the 1 screw (BH, M3x4 (NI)) and detach the “Plate Ribbon Cable Stay”.
7. Remove the “”Support Pop Up” and peel off the labels (“Label 2, Caution Head (AH50)”,
“Label 6, Caution, Head/Label 7, Caution, Head/Label, Caution Head (China)” “Label, Head
Adjust” and “Label, Head Balance”) from the “SA Cover Frame”.
Notes on reassembling:
• Apply FLOIL G-311S to the following places. (See the mark
Ì shown in the figure.)
Pivot Head Balance Cam: Surface.
Cam Head Balance: Along the cam surface.
SA Cover Frame: The slit into which the claw of “Plate Head Balance” is inserted.
(to be continued on the next page)
BH, M3x4 (NI)
PH, M3x10
"Plate Holder Head" Block
Label 2, Caution, Head (AH50)
Label 6, Caution, Head/
Label 7, Caution, Head/
Label, Caution Head
PH, M3x6
Pivot Head Balance Cam
Cam Head Balance
Label, Head Balance
Holder Guide Sensor U
BH, M3x4 (NI)
Label, Head Adjut
Support Pop Up
Plate Ribbon
Cable Stay
SA Cover Frame
Spring
Head R
Spring Head L
BH, M3x4 (NI)
PH, M3x10
Spacer Head Balance
Plate Head Balance
FLOIL G-311S


