


Disassembly, Reassembly and Lubrication
3-53 CL-S6621
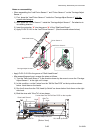
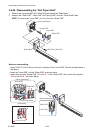
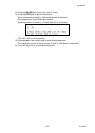
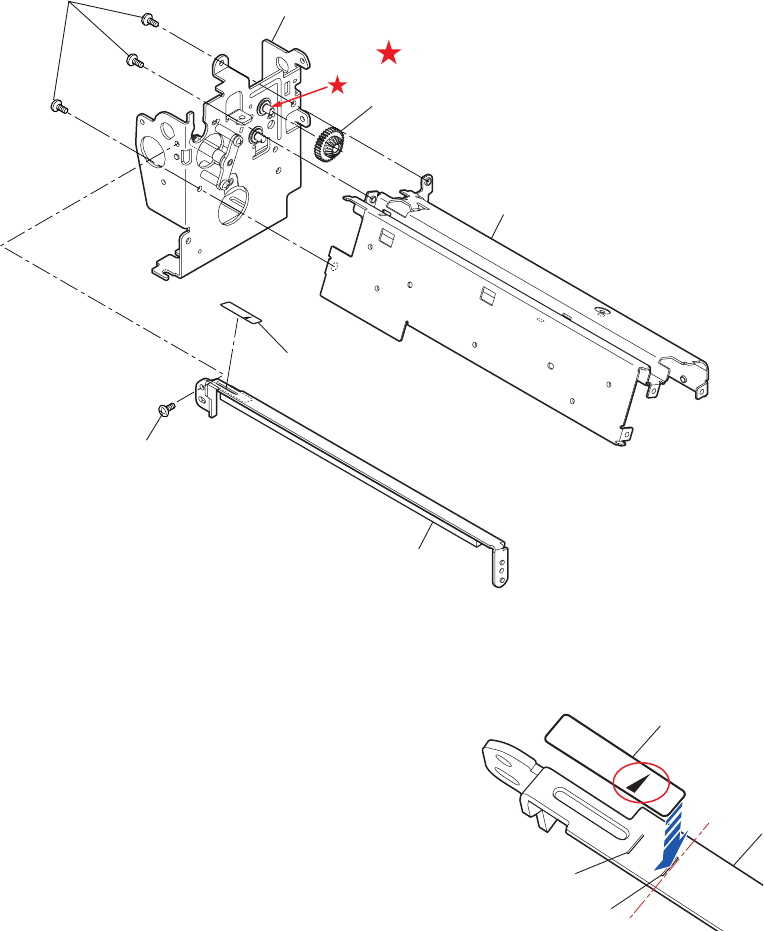
Label Edge Mark
Mark
Slit "A"
Another slit
Plate Peel Guide
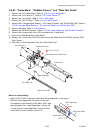
3-6-23. “Frame Main”, “SA Main Frame L” and “Plate Peel Guide”
1. Remove the “Unit, Mechanism”. Refer to “3-6-13(1) Unit, Mechanism”.
2. Remove the “Unit, Sensor U”. Refer to “
3-6-15 Unit, Sensor U”.
3. Remove the “Unit, Head”. Refer to “
3-6-17 Unit, Head”.
4. Remove the “SA, PF Motor”. ”Refer to “
3-6-19 SA PF Motor”.
5. Remove the “Carriage Adjust Sensor L” “SA, Head Up Switch” and “SA Ref Sen PCB”. Refer to
“
3-6-20 “Carriage Adjust Sensor L”, “SA, Head Up Switch” and “SA Ref Sen PCB””.
6. Remove the gears. Refer to “
3-6-21 Gears”.
7. Remove the “SA Main Frame R”. Refer to “
3-6-22 “Lever Head Lock” and “SA Main Frame R””.
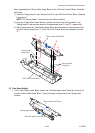
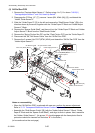
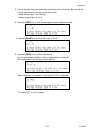
8. Remove the 3 screws (BH, M3x4 (NI)) and detach the “Frame Main”.
9. Pull out the “Gear Bevel Joint Lead Screw”.
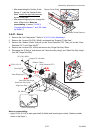
10. Remove the 1 screw (BH, M3x4 (NI)) and remove the “Plate Peel Guide” Block from the “SA2
Main Frame L”.
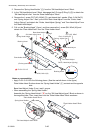
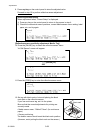
11. Peel off the “Label Edge Mark” from the “Plate Peel Guide”.
Notes on reassembling:
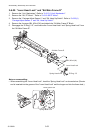
• Apply FLOIL G-311S to the gear shaft. (See the mark
Ì shown in the figure.)
• Stick the “Label Edge Mark” as shown on the right.
Pay attention to the direction of the Mark. Then, align
the right edge of the “Label Edge Mark” with the slit
“A” and stick the “Label Edge Mark” onto the “Plate
Peel Guide” so that it covers in the slit “A”.
BH, M3x4 (NI)
Plate Peel Guide
Frame Main
SA2 Main Frame L
BH, M3x4 (NI)
Gear Bevel Joint Lead Screw
Label Edge Mark
FLOIL G-311S