Operation of Each Mechanism
CL-S6621 2-12
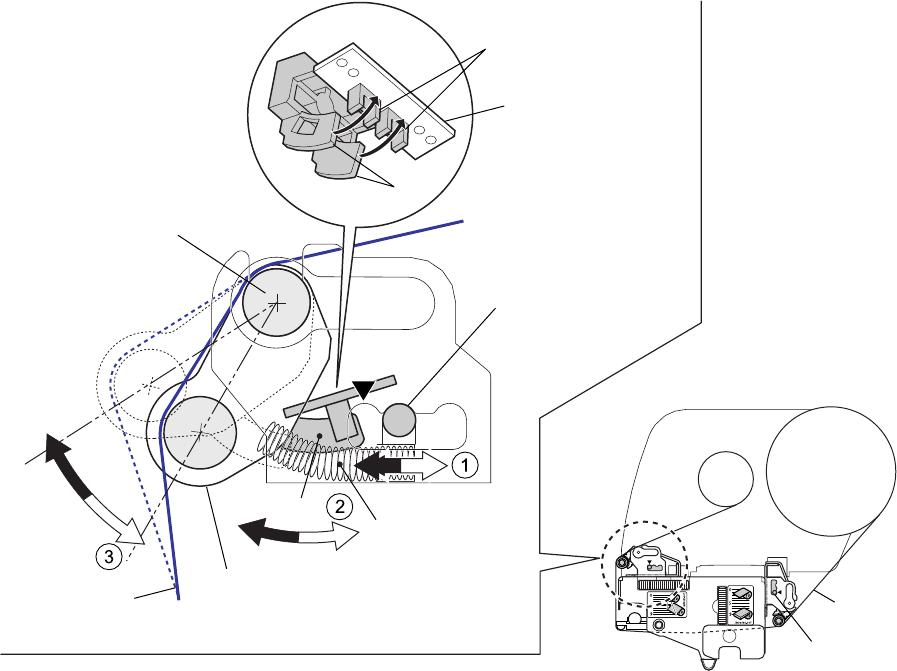
Detecting Ribbon Tension (Ribbon Sensors):
The same ribbon sensor is installed on the front and rear sides. Since the operation is the same on
both sides, the front side operation is explained here:
When ribbon is taken up, the ribbon tightens and the “SA, Ribbon Tension Shaft F” is pushed
inward (in the direction of “a”) by the ribbon. At this time, the claws “A” attached to the “SA, Ribbon
Tension Shaft F” are inserted into the photointerrupters of the “SA, Ribbon Sensor”, and the
photointerrupters turn OFF.
During printing, the ribbon is fed forward together with media and the ribbon will slack. This, the
“SA, Ribbon Tension Shaft F” is moved outward (in the direction of “b”) by the spring (“B”) force,
and the claws “A” come off the photointerrupters. So, the photointerrupters turn ON and the “SA
Ribbon Motor F” turns faster to take up the ribbon quickly. Then, the claws “A” are inserted into the
photointerrupters again, and the “SA Ribbon Motor F” resumes normal speed.
This cycle is repeated and constant tension is applied to the ribbon.
(The two claws “A” are arranged so that they are inserted into or released from the
photointerrupters with a slightly different timing. This function enables to finely control the ribbon
tension.)
On the rear side, during printing, ribbon will be tightened. If it is tightened, the ribbon sensor turns
ON and the “SA Ribbon Motor R” turns faster than normal speed to quickly supply ribbon.
Tension Adjustment Mechanism:
To apply adequate ribbon tension, you can change the spring “B” force as follows:
The spring force is adjustable in 3 steps with the “Tension Adjustment Knob (Front/Rear)”. As you
move the knob toward the
T mark, the spring force becomes stronger since the spring “B” is
moved to the left in the above figure.
Tension Adjustment
Knob (Front)
SA, Ribbon Sensor
Supporting Point
SA, Ribbon
Tension Shaft F
Ribbon
Spring Ribbon
Tension (2 pcs.)
Ribbon
A
Tension Adjustment
Knob (Rear)
[Right side view]
a
b
B
Ribbon Sensor
A


