


3) The Server field should contain the Local value. You can supply the Title of
your choice.
4) Rename the file in the File Name field to match the naming conventions of
your organization. This copy of the template must keep the .nsf suffix. For
example: development.nsf.
5) Select the folder icon button, which will open the Choose a folder window.
Choose the directory on your local file system that will store the database.
6) In the Copy field select the Database design only radio button, and leave
the Access Control List checkbox checked, so that the new database will
inherit those characteristics from the empty template database.
7) Select OK.
c. Add yourself as an Administrator to the Access Control List for the new
database as follows:
1) Using mouse button 2, select the notes database icon on your Notes
workspace page.
2) Select Access Control.
3) From the Access Control List window select Add.
4) Enter your full Notes name, as it would appear in your Notes Address Book.
5) Assign yourself the role of Administrator and Authorby selecting them in
the Roles box of the panel.
6) Assign a value of Person in the User type field and Manager in the Access
field.
7) Select OK.
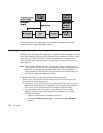
d. Open the new empty database. The About overview window will display
showing what this Notes database is. When you read and exit (Escape) this
window, the main window for this database should display.
e. There are 3 choices on this window: Setup, Proceed to Database, and Help.
We suggest that you select Help to view the
About
document before proceeding
to Setup.
About
provides details about database and document types that may
be beneficial during the setup process.
f. Select Setup.
Note: If you are not defined with the role of Administrator in the Access Control
List, you will only be able to view the setup in read—only mode.
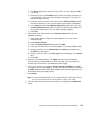
g. From the Setup window follow the instructions on completing the Initialization
setup.
Chapter 8. Creating and Maintaining Integrated Notes Databases 113