


Chapter 3. The basics of using TeamConnection
All users of TeamConnection perform a number of basic tasks, such as checking parts
out of TeamConnection and then back in, and testing and verifying part changes. Before
you start doing these tasks, you need to understand the basic concepts behind them;
that is what this chapter explains.
This chapter assumes that you have read “Chapter 1. An introduction to
TeamConnection” on page 3 and are familiar with the different objects, such as
components and releases. The other chapters in this part of the book define in more
detail how you perform the TeamConnection tasks.
Laying the groundwork
Someone has already created your family’s component structure, and those
components manage your parts and control access to the data. Your TeamConnection
family also contains releases. A release identifies a version of all the parts that
comprise an application at a given point in time. When you create a release, you
specify the component that will manage it. One component manages a release, but
many components can manage the individual parts associated with that release.
A single part can be associated with more than one release, but it is managed by one
component. When you create a part, you specify the release that you want to associate
with the part and the component that you want to manage it. At any time, you can link
the created part to other releases so that the part can be shared, or you can change its
managing component.
Before you start working with parts, you need to be familiar with your family’s
component structure. This will help you when trying to locate parts within
TeamConnection and when writing defects and features. You can do the following to
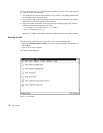
display your family’s component structure from the GUI:
1. Select Components → Components from the Objects pull-down menu on the Tasks
window. The Component Filter window appears.
2. Type the name of the component that is at the top of your component hierarchy in
the Component field, and select OK. Initially this component is called root. The
Components window appears, listing the component.
3. Verify that the component is displayed in tree view (a plus sign (+) appears before
the component name). If not, select Tree from the View pull-down menu.
4. Select Expand fully from the Selected pull-down menu.
© Copyright IBM Corp. 1992, 1995, 1996, 1997, 1998 25