


Alex can use either the GUI or the command line to reconcile the differences. Four
steps are required from the command line:
1. Check out the latest uncommitted version.
2. Extract the latest committed version.
3. Run the merge program against the two parts.
4. Check in the resultant part.
However, on the GUI the reconcile action automatically does the preceding steps for
you, which can save you a considerable amount of work if several parts require
reconciliation.
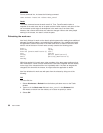
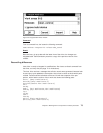
GUI
From the GUI, he:
1. Selects Parts → Collision Records from the Objects pull-down menu. The Collision
Record Filter window appears.
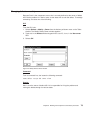
2. Types 310 in the Work areas field and selects OK. The Collision Records window
appears with optics.c listed as the part having the collision.
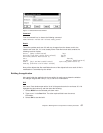
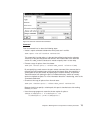
3. Highlights the optics.c entry and selects Reconcile from the pop-up menu. The
Reconcile Collision Record window appears with the required information pre-filled.
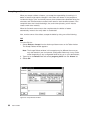
Alex does not have to reconcile every part for which a collision record is created.
He can choose either his copy or the copy at the release rather than combining the
two. For example, if Alex wants to use his copy of optics.c without merging with the
copy at the release level, he selects the reject action (of course, he would not do
that without first talking with Jenny). If he wants to use the copy of optics.c at the
release level without merging any of his changes into the copy at the release level,
he selects the accept action.
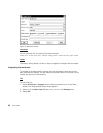
4. Because Alex wants to combine the two sets of changes, he selects Merge to start
the TeamConnection merge program, or any merge program of his choice. Alex
merges the changes and then saves and exits from the merge program.
TeamConnection checks the resultant part back in as part of this merge step.
The online help provides information on how to use the merge program.
5. Selects OK from the Reconcile Collision Record window.
74 User’s Guide