


•
If youare expandinga preprovisioned configuration,editedthe existing VirtualChassis
configuration to include the serial number of the newmember switch. Youcanspecify
theroleofthenewmemberswitchwhenyouadditsserialnumberintheVirtualChassis
configuration file.Theparametersspecifiedinthe masterVirtualChassisconfiguration
file are applied after the new member switch has been interconnected with its uplink
VCP to an existing member switch.
•
Confirmed that the new,currently standalone switch is powered off.
•
Prepared an existing member switch for interconnecting with the new switch through
an uplink module port by configuring an uplink module port as a VCP on the existing
member switch.
NOTE: After you have created a preprovisioned Virtual Chassis configuration, you can
use the autoprovisioning feature to add member switches to that configuration.
To add a new member switch that is going to be interconnected with the existing Virtual
Chassis configuration across wiring closets:
1. Power on the new switch.
2. Connect a laptop or terminal to the console port of the switch, or use EZSetup on
the standalone switch to specify temporary identification parameters. (When you
interconnectthenewmemberswitchwiththe existingVirtual Chassisconfiguration,
the master will overwrite and disable any specified parameters that conflict with
the Virtual Chassis parameters or assigned member configuration.)
3. Use the CLI or the J-Web interface to set the uplink module ports as VCPs.
NOTE: If you are using a nonprovisioned configuration, youmight configure the new
member switch with a mastership priority value that is less than that of the existing
member switches. Doing so ensures that the new member switch will function in a
linecard role when it is included within the Virtual Chassis configuration.
4. Power off the new switch.
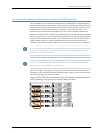
5. Interconnect the new member switch to at least one member of the existing Virtual
Chassis configuration using the uplink module ports on each of the switches that
have been configured as VCPs.
6. Power on the new member switch.
7. Confirm that the new member switch is now included within the Virtual Chassis
configurationbycheckingthefront-paneldisplayforthememberID.Itshoulddisplay
a member ID that is higher than 0 (1 through 9), because there is already at least
one member of the Virtual Chassis configuration.
NOTE: If you are using a preprovisioned configuration, the member ID is automatically
assignedto the member's serial number in the configuration file.
111Copyright©2010, JuniperNetworks, Inc.
Chapter8:Planningthe VirtualChassis