


• Connecting and Configuring an EX Series Switch (CLI Procedure) on page 165
• Connecting and Configuring an EX Series Switch (J-Web Procedure) on page 167
• Mounting an EX3200 or EX4200 Switch in a Recessed Position in a Rack or Cabinet
on page 128
• Rack-Mounting and Cabinet-Mounting Warnings for EX Series Switches on page 221
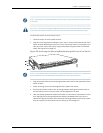
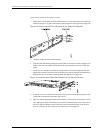
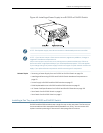
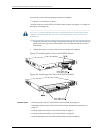
Mounting an EX3200 or EX4200 Switch in a Recessed Position in a Rack or Cabinet
You can mount an EX3200 or EX4200 switch in a rack or cabinet such that the switch
is recessed inside the rack from the rack front by 2 inches. Youcan use the 2-in.-recess
front brackets provided in the separately orderable four-post rack-mount kit to mount
the switch in a recessed position.
Reasons that you might want to mount the switch in a recessed position include:
•
Youaremountingtheswitchinacabinetandthecabinetdoorswillnotclosecompletely
unless the switch is recessed.
•
Theswitchyouaremountinghasanuplinkmodulewithtransceiversinstalledinit—the
transceivers in the uplink module ports protrude from the front of the switch.
To mount the switch in a recessed position on four posts, follow the instructions in
“MountinganEX3200orEX4200SwitchonFourPostsinaRackorCabinet”onpage124.
To mount the switch in a recessed position on two posts, follow the instructions in
“MountinganEX3200 orEX4200Switchon TwoPostsin aRackorCabinet”onpage122.
Related Topics Connecting Earth Ground to an EX Series Switch on page 141•
• Rack-Mounting and Cabinet-Mounting Warnings for EX Series Switches on page 221
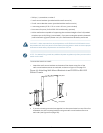
Mounting an EX3200 or EX4200 Switch on a Wall
You canmount an EX3200or EX4200switchon awallbyusing the separatelyorderable
wall-mount kit.
Before mounting an EX3200 or EX4200 switch on a wall:
•
Verify that the site meets the requirements described in “Site Preparation Checklist
for EX3200 and EX4200 Switches” on page 87.
•
Read “General Safety Guidelines and Warnings for EX Series Switches” on page 207,
with particular attention to “Chassis Lifting Guidelines for EX3200 and EX4200
Switches” on page 220.
•
Remove the switch from the shipping carton (see “Unpacking an EX3200 or EX4200
Switch” on page 118).
Ensure that you have the following parts and tools available:
Copyright ©2010,Juniper Networks,Inc.128
CompleteHardwareGuide forEX3200 andEX4200 EthernetSwitches