


NOTE: Onepersonmustbeavailabletolifttheswitchwhileanothersecurestheswitch
to the rack.
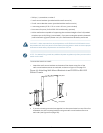
CAUTION: Ifyouaremountingmultipleswitchesonarack,mountaswitchinthebottom
of the rack first and proceed to mount the rest of the switches from bottomto top.
To mount the switch on two posts in a rack:
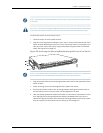
1. Place the switch on a flat, stable surface.
2. Align the mounting brackets along the front, rear,or center of the side panels of the
switch chassisdepending on how youwantto mount the switch. For example,if you
want to center-mount the switch, align the brackets along the centers of the side
panel. See Figure 38 on page 123.
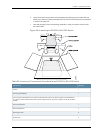
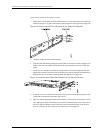
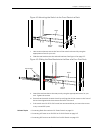
Figure 38: Attaching the Mounting Bracket Along the Front of the Switch
NOTE: Ifyouneedtomount theswitchina recessedposition, usethe 2-in.-recessfront
mount brackets from the separately orderable four-post rack-mount kit.
3. Alignthe bottomholesin the mountingbracketswith holes onthe side panelsofthe
switch chassis.
4. Insert mounting screws into the aligned holes. Tighten the screws.
5. Ensure that the other holes in the mounting brackets are aligned with the holes in
the side panels. Insert a screw in each hole and tighten the screws.
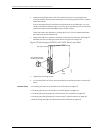
6. Have one persongrasp both sides of the switch, lift the switch, and position it in the
rack, aligning the mounting bracket holes with the threaded holes in the rack or
cabinetrail. Align the bottomholein both the mounting bracketswith a hole in each
rack rail, making sure the chassis is level. See Figure 39 on page 124.
123Copyright©2010, JuniperNetworks, Inc.
Chapter9:Installing theSwitch