


The configured parameters are displayed. Enter yes to commit the configuration.
The configuration is committed as the active configuration for the switch. Youcan now
log in with the CLI or the J-Web interface to continue configuring the switch. If you use
the J-Web interface to continue configuring the switch, the Web session is redirected to
thenewmanagementIPaddress.Iftheconnectioncannotbemade,theJ-Webinterface
displays instructions for starting a J-Web session.
Related Topics Connecting and Configuring an EX Series Switch (J-Web Procedure) on page 167•
• Installing and Connecting an EX2200 Switch
• Installing and Connecting an EX3200 or EX4200 Switch on page 117
• Installing and Connecting an EX4500 Switch
• Installing and Connecting an EX8208 Switch
• Installing and Connecting an EX8216 Switch
Connecting and Configuring an EX Series Switch (J-Web Procedure)
TherearetwowaystoconnectandconfigureanEXSeriesswitch:onemethodis through
the console using the CLI and the other is using the J-Web interface. This topicdescribes
the J-Web procedure.
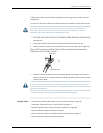
NOTE: Before youbegin the configuration, enable a DHCP client on the management
PC you will connect to the switch so that the switchcan obtain an IP address
dynamically.
NOTE: Readthefollowingstepsbeforeyoubegintheconfiguration.Youmustcomplete
the initial configuration using EZSetup within 10 minutes. The switch exits EZSetup
after 10 minutes and reverts to the factory defaultconfiguration, and the PC loses
connectivity to the switch.
•
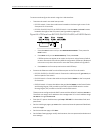
EX2200 switch—The LEDs on the network ports on the front panel blink when the
switch is in the initial setup mode.
•
EX3200,EX4200,EX4500,orEX8200switch—TheLCDdisplaysacount-downtimer
when the switch is in initial setup mode.
167Copyright© 2010,Juniper Networks,Inc.
Chapter12:PerformingInitialConfiguration