


magicolor 330 - Base Engine Service Manual 9-135
Removal and Replacement Procedures
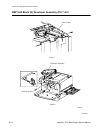
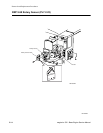
RRP 9.65 Black (K) Developer Assembly (PL7.1.40)
Removal
1. Open the Front Cover.
2. Remove the Black Toner Cartridge (RRP 9.58).
3. Remove the Xerographic Cartridge (RRP 9.48).
4. Remove the Top Cover Assembly (RRP 9.3).
5. Remove the Inner Cover Assembly (RRP 9.2).
6. Remove the Used Cartridge Sensor (RRP 9.70).
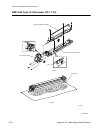
7. Remove the screw securing the Rotary Latch to the front of the printer frame and remove the Latch
(Figure 1).
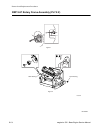
8. Turn the Rotary Knob until the large, shoulder screw securing the Black Developer Assembly to the
Rotary Frame appears through the access hole a few inches above the Rotary Knob (Figure 2).
9. Remove the shoulder screw securing the Black Developer Assembly to the Rotary Frame.
10. Reaching in through the top of the printer, slide the Black Developer Assembly to the front of the printer
to free the gears at the rear of the Developer Assembly.
11. Make sure you do not damage the Exit Actuator as you lift the front of the Black Developer Assembly
to free the front of the Assembly from the front of the printer frame, and remove the Assembly.
Replacement
1. Turn the Rotary Knob until you can access the Black Developer Assembly cavity through the top of the
printer.
There is a "K" molded into the rear of the Black Developer Assembly cavity.
2. Hold the Black Developer Assembly so the rear, or gear end, of the Assembly is slightly lower than the
front.
3. Slide the rear of the Assembly into the locating pins located at the rear of the Black Developer Assem-
bly.
4. Lower the front end of the Assembly making sure you do not damage the Exit Actuator.
5. Reposition the Black Developer Assembly until the Assembly seats firmly in the Rotary Frame and the
screw hole at the front of the Assembly lines up with the screw hole at the front of the Rotary Frame.
6. Turn the Rotary Knob until the screw hole in the front of the Black Developer Assembly appears
through the access hole a few inches above the Rotary Knob.
7. Use a large, shoulder screw to secure the Black Developer Assembly to the Rotary Frame.
8. Reinstall the Used Cartridge Sensor (RRP 9.70).
9. Reinstall the Rotary Latch to the front of the printer frame and use one screw to secure the Latch to the
frame.
10. Reinstall the Inner Cover Assembly (RRP 9.2).
11. Reinstall the Top Cover Assembly (RRP 9.3).
12. Reinstall the Xerographic Cartridge (RRP 9.48).
13. Reinstall the Black Toner Cartridge (RRP 9.58).
14. Close the Front Cover.