


magicolor 330 - Base Engine Service Manual 9-179
Removal and Replacement Procedures
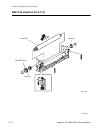
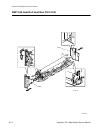
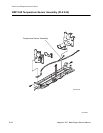
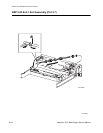
RRP 9.87 Upper Fuser Assembly (PL9.2.23)
Removal
1. Remove the Main Fuser Assembly (RRP 9.81).
2. Remove the screw, located at the bottom of a long access hole at the front of the Upper Fuser Assem-
bly, that secures the copper strap coming from the Upper Fuser Assembly to the Fuser Front Cover.
3. Remove the screw, located at the bottom of a long access hole at the rear of the Upper Fuser Assem-
bly, that secures the copper strap coming from the Upper Fuser Assembly to the Fuser Rear Cover.
4. Remove the two screws securing the Upper Fuser Assembly to the Main Fuser Assembly and remove
the Upper Fuser Assembly.
5. Remove the Fuser Temperature Sensor (RRP 9.88).
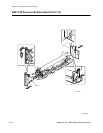
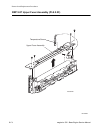
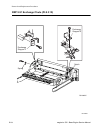
Replacement
1. Reinstall the Fuser Temperature Sensor (RRP 9.88).
2. Make sure the Fuser Rear Cover is in place on the Main Fuser Assembly.
3. Make sure the Fuser Front Cover is in place on the Main Fuser Assembly and that the flat end of the
Pressure Roll Heat Rod is resting on top of the metal screw hole inside the Fuser Front Cover.
4. Reinstall the Upper Fuser Assembly on top of the Main Fuser Assembly, making sure the tabs on the
Main Fuser Assembly fit through the slots in the Upper Fuser Assembly.
5. Make sure the screw holes in the ends of the copper strap line up with the screw holes in the Fuser
Rear and Fuser Front Covers.
6. Use two screws to secure the Upper Fuser Assembly to the Main Fuser Assembly.
7. Insert the heavy black wire into the slot in the Fuser Rear Cover so the black wire connector is over the
copper strap.
8. Place one screw down the access hole at the rear of the Upper Fuser Assembly to secure the black
wire connector and the copper strap to the Fuser Rear Cover.
9. Place one screw down the access hole at the front of the Upper Fuser Assembly to secure the copper
strap to the Fuser Front Cover.
10. Reinstall the Main Fuser Assembly (RRP 9.81).