


7–Configuring FCoE in a Windows Environment
Boot from SAN
7-20 FE0254601-00 A
Configuring an Adapter to Boot-from-SAN
This section describes how to configure a QLogic 8100 Series Adapter to boot the
Microsoft Windows operating system from the SAN.
1. Install the QLogic 8100 Series Adapter, and update the firmware, if
necessary. For information about updating the firmware, refer to “Firmware
Upgrades” on page 3-33.
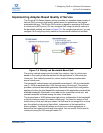
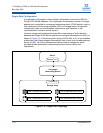
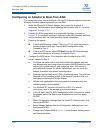
2. Connect the SAN components in a single-path topology, as shown in
Figure 7-6. If a multipath topology is required, make the necessary additions
and connections after the initial operating system installation.
3. Power up the server.
If this is a BIOS server, press CTRL+Q or ALT+Q while the server is
booting to open the QLogic Fast!Util BIOS configuration utility.
Proceed to Step 4.
If this is a UEFI server, select EFI Shell from the EFI Boot manager
menu while the server is booting. Proceed to Step 5.
4. Configure the BIOS server. For information about configuring an UEFI
server, proceed to Step 5.
a. Configure the switch with a zone that includes the adapter port and
one storage array port using either soft zoning (WWPN-based) or hard
zoning (port number-based), and enable the zone. Soft zoning is
recommended because if a server malfunctions, you can move the
adapter to another host without reconfiguration.
b. Create an appropriately-sized LUN on the storage array. The LUN size
depends on the operating system to be installed. Add this LUN to a
host group containing the QLogic adapter.
c. Set the host type/mode for the host group that corresponds to the
operating system to be installed.
d. For Windows XP, the boot LUN must be LUN 0. For specific
instructions, refer to the storage array documentation.
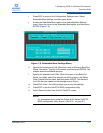
e. In the QLogic Fast!UTIL BIOS configuration utility on the server, select
the adapter port in the Select Host Adapter menu, and then press
ENTER.
f. Select Configuration Settings from the Fast!UTIL Options menu, and
then press ENTER.
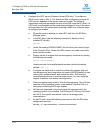
g. Select Adapter Settings from the Configuration Settings menu, and
then press ENTER.
h. Change Host Adapter BIOS to Enabled in the Adapter Settings menu,
and then press Enter.