


Creating Expense Reports
Creating an Expense Report in NeatWorks is easy. In NeatWorks, an Expense Report
is a folder whose Folder Type has been assigned to the Expense Report category. If
you've already scanned the receipts that you want to use in an Expense Report, just
choose Expense Report in the Folder Type column.
To add additional receipts to an expense report, be sure to select that folder when
filing them.
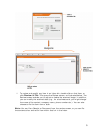
Creating a New Expense Report
To create an expense report, choose New Folder from the toolbar and then assign
a folder type of Expense Report.
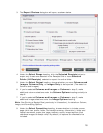
Now you can simply start scanning receipts. Each receipt you file will be added to
the Receipts Grid of the selected Expense Report. Some helpful hints:
• Use the Reimbursable column to check off receipts that your company or client
needs to reimburse you for.
• Use the Personal column to check off expenses that do not require reimbursement.
• Use the Bill Paid column to track expenses as you are compensated for them.
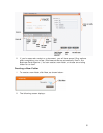
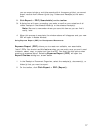
When you are ready to create and send the Expense Report to someone, simply
select the folder containing the expense report receipts and Click on Export >
Expense Report (PDF) You can save the report anywhere on your hard drive and the
email it as an attachment.
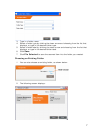
Splitting a Receipt Across Multiple Folders
A single receipt may contain multiple items that need to be expensed to more than
one client or project. NeatWorks makes it easy for you to split a receipt across
multiple Folders. First you will split the receipt into the appropriate number of items,
which in turn creates a new row for each item. Then you will use the Cut and Paste
commands to move a row to a different Folder.
1.
In the Receipts Grid, select the receipt you want to split.
2. Click Split Receipt on the upper right side of the Receipts Grid.
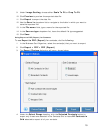
3. In the
Step 1 area of the Split Receipts dialog box, indicate the number of
transactions to split the receipt into. You can:
• type a number, OR
• use the up/down arrows to change the current number.
•
Note: The maximum number of transactions is 10. The number
indicated here dictates the number of items listed in the Step 2 area.
4. In the
Step 2 area of the Split Receipts dialog box, do one of the following:
• Click
Split Equally to split the amount total equally among the items.
• Type a number or use the up/down arrows to change the current number
in the
Amount field.
• Type a number or use the up/down arrows to change the current number
in the
Percentage field.
13