


How do I import and export r
Impo
It a
Nea W
1. re storing it.
ks will start automatically (if it's not already running)
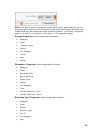
der File
from the toolbar, navigate to the folder containing the .nrx
sible
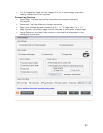
Expo
NeatW ,
HTML , Quicken, MS Money, OFX, and CSV (comma separated values).
N , and
HTML format. To to export QuickBooks, Quicken, MS Money, OFX, and CSV
fo
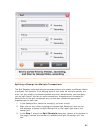
ers?
eceipts?
rting Receipts
's e sy to import receipt folder(s) that have been emailed to you from other
t orks users.
First, download the .nrx (or .zip) file, taking note of where you a
2. Next, do one of the following:
• Navigate to the folder containing the .nrx file and double-click on the
file's icon. NeatWor
and import the file
• If NeatWorks is already running, choose
Import From > Receipt
Fol
file and select it.
The new folder row(s) appears in the upper grid (.nrx file can contain one or
more folders of receipts). The receipts contained in those folders will be vi
in the lower grid.
rting Receipts
orks allows receipts to be exported in a variety of formats: PDF, Excel, Word
, QuickBooks
ote: The following steps describe how to export receipts in PDF, Excel, Word
learn how
rmats, see the topics in
How do I import and export fold
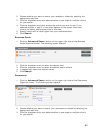
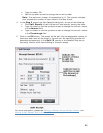
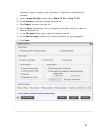
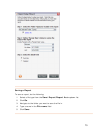
1. Select the receipts(s) or folder(s) you want to export.
3.
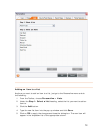
choose an export format. The Export Choices
selected in the Receipts Grid or leave
Selected
Folder (All Receipts)
selected to export the entire folder.
5. Under the
Select Range heading, choose whether you want Columns and
Images
, Columns Only, or Images Only to be exported. (The default is
Columns and Images.)
6. If you've selected
Columns and Images or Columns in step 5, make
additional column selections under the
Column Options heading and skip to
step 8.
7. If you've selected
Columns and Images or Columns in step 5, make
additional image selections under the
Image Options heading. Note: See
Printing a Receipt Row (previously in this section), for details on Column,
Image, and Formatting Options.
8. Under the
Select Formatting heading, choose whether to include a cover
page (with user profile, folder, and receipt summary information), folder and
receipt comments, paper size, page numbers, and/or image captions (that
2. From the Toolbar, choose
Export.
From the
Export submenu,
dialog box opens (pictured at the bottom of this page).
4. Under the
Select Range heading, click the Selected Receipts button to
export only those rows
66