


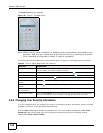


Chapter 8 PBX Tutorials
ISG50 User’s Guide
174
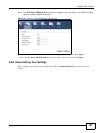
In order to do this, he must map his connections:
• The first menu and the submenus both utilize an auto-attendant. Auto-attendants are set up in
the Configuration > PBX > Outbound Line Management > Auto-Attendant > Customized
screen. This portion of the tutorial is described in Section 8.10.4 on page 178.
• The skills are the intermediaries between the AA submenu and the agents. Skills are set up in the
Configuration > PBX > ACD > Skill screen. This portion of the tutorial is in Section 8.10.3 on
page 175.
• The agents associated are the ultimate destination for incoming calls to the system. Agents are
set up in the Configuration > PBX > ACD > Agent screen. This portion of the tutorial can be
found in Section 8.10.2 on page 174.
Although the usage order is 1st Menu - Submenus - Skills - Agents, we have to build our system in
reverse order by starting with the ACD-based agents and skills and then work our backwards
toward the auto-attendant-based menus. This is because the auto-attendant menus require the
skills to already be defined when setting them up as part of an automated menu system, while skills
require agents to be pre-defined as they are set up.
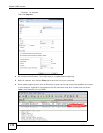
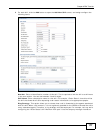
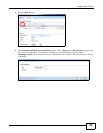
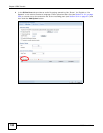
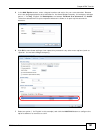
8.10.2 Create an Agent Identity
Now that you have more or less mapped out your automated menus and call routes, it’s time to
actually start building them on the ISG50. The first thing we’re going to do is create our agent
identities. This allows us to assign the agents immediately to skills as we create them in the next
section.
To create an agent identity:
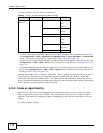
Table 25 Tutorial: Example Automated Menu Design
1ST MENU SUBMENUS SKILLS AGENTS
Language
Selection
English Order Status Tom
Pam
Steven
Technical Support Steven
George
Accounts and Billing George
Spanish Estado del Pedido Eddie
Susan
Maria
Apoyo Técnico Maria
Alejandro
Cuentas y Facturación Alejandro