


3 – Managing Fabrics
Managing the Fabric Database
59048-04 Rev. B 3-5
D
3.2.4
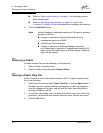
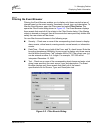
Saving a Fabric View File
To save a view file, do the following:
1. Open the File menu, and select Save View As.
2. In the Save View dialog, enter a new file name.
3. Enter a file password, if necessary.
4. Click the OK button.
3.2.5
Rediscovering a Fabric
After making changes to or deleting switches from a fabric view, it may be helpful
to again view the actual fabric configuration. The rediscover fabric option clears
out the current fabric information being displayed, and rediscovers all switch
information. To rediscover a fabric, open the Fabric menu, and select Rediscover
Fabric. The rediscover function is more comprehensive than the refresh function.
3.2.6
Adding a New Switch to a Fabric
If there are no special conditions to be configured for the new switch, simply plug
in the switch and the switch becomes functional with the default fabric
configuration. The default fabric configuration settings are:
Fabric zoning is sent to the switch from the fabric.
All ports will be GL_Ports.
The default IP address 10.0.0.1 is assigned to the switch without a gateway
or boot protocol configured (RARP, BOOTP, and DHCP).
If you are adding a new switch to a fabric and do not want to accept the default
fabric configuration, do the following:
1. If the switch is not new, reset the switch to the factory configuration before
adding the switch to the fabric by selecting Restore Factory Defaults in the
Switch menu from the faceplate display.
2. If you want to manage the switch through the Ethernet port, you must first
configure the IP address using the Network Properties dialog or the
Configuration Wizard.
3. Configure any special switch settings. Consider configuring the Default
Visibility setting to None in the Zoning Config dialog to prevent devices from
finding other devices on all switches in the fabric until the new switch is
configured. To open the Zoning Config dialog, open the Zoning menu, and
select Edit Zoning Config.
4. Plug in the inter-switch links (ISL), but do not connect the devices.