


Network setup (CLX-3185N/CLX-3185WK/CLX-3185FN/CLX-3185FW only)_ 6
10.Select your machine and click Next.
11.Input the printer description and Next
12.When the add printer is done, click Finish
13.When the install is done, click Finish
Add network Printer
1.Double-click the Unified Driver Configurator.
2.Click Add Printer…
3.The Add printer wizard window opens. Click Next.
4.Select Network printer and click the Search button.
5.The printer’s IP address and model name appears on list field.
6.Select your machine and click Next.
7.Input the printer description and Next
8.When the add printer is done, click Finish.
IPv6 Configuration
TCP/IPv6 is supported properly only in Windows Vista or higher.
If the IPv6 network seems to not be working, set all the network setting
to the factory defaults and try again (See
"Restoring factory default
settings" on page 3).
In the IPv6 network environment, follow the next procedure to use the IPv6
address.
1. Connect your machine to the network with a network cable.
2. Turn on the machine.
3. Print a Network Configuration Report from the machine’s control
panel that will check IPv6 addresses.
a)Press Menu on the control panel.
b)Press the left/right arrow until Network appears and press OK.
c)Press the left/right arrow until Network Info. appears and press
OK.
d)Press the left/right arrow until Yes appears and press OK.
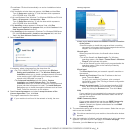
4. Select Start > Control Panel > Printers and Faxes.
5. Click Add a printer on the left pane of the Printers and Faxes
windows.
6. Click Add a local printer on the Add Printer windows.
7. The Add Printer Wizard window appears. Follow the instruction on the
window.
If the machine does not work in the network environment, activate
IPv6. Refer to the next section followed by.
Activating IPv6
The machine is provided with IPv6 feature on.
1. Press Menu on the control panel.
2. Press the left/right arrow until Network appears and press OK.
3. Press the left/right arrow until TCP/IP (IPv6) appears and press OK.
4. Press the left/right arrow until IPv6 Activate appears and press OK.
5. Press the left/right arrow until On appears and press OK.
6. Turn the machine off and turn it on again.
7. Reinstall your printer driver.
Setting IPv6 addresses
Machine supports the following IPv6 addresses for network printing and
managements.
• Link-local Address: Self-configured local IPv6 address (Address starts
with FE80).
• Stateless Address: Automatically configured IPv6 address by a
network router.
• Stateful Address: IPv6 address configured by a DHCPv6 server.
• Manual Address: Manually configured IPv6 address by a user.
DHCPv6 address configuration (Stateful)
If you have a DHCPv6 server on your network, you can set one of the
following option for default dynamic host configuration.
1.Press Menu on the control panel.
2.Press the left/right arrow until Network appears and press OK.
3.Press the left/right arrow until TCP/IP (IPv6) appears and press OK.
4.Press the left/right arrow until DHCPv6 Config appears and press OK.
5.Press the left/right arrow to access the required value.
•DHCPv6 Addr.: Always use DHCPv6 regardless of router request.
•DHCPv6 Off: Never use DHCPv6 regardless of router request.
•Router: Use DHCPv6 only when requested by a router.
6.Press OK.
Manual address configuration
1.Start a web browser such as Internet Explorer that supports IPv6
addressing as a URL.
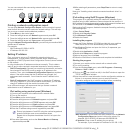
2.When the SyncThru™ Web Service window opens, move the mouse
cursor on the Settings of the top menu bar and then click Network
Settings.
3.Click TCP/IPv6 on the left pane of the website.
4.Select the Manual Address check box. Then, the Address/Prefix text
box is activated.
5.Enter the rest of address (ex:3FFE:10:88:194::AAAA. “A” is the
hexadecimal 0 through 9, A through F).
6.Click the Apply button.
Using SyncThru™ Web Service
1. Start a web browser such as Internet Explorer that supports IPv6
addressing as a URL.
2. Select one of the IPv6 addresses (Link-local Address, Stateless
Address, Stateful Address, Manual Address) from Network
Configuration Report (See
"Printing a network configuration report" on
page 2).
3. Enter the IPv6 addresses (ex: http://[FE80::215:99FF:FE66:7701]).
Address must be enclosed in '[ ]' brackets.